Her-Bivore Blog

 RSS Feed

  1. Apricot Energy Balls

    Apricot Energy Balls

    Recently I’ve been looking into some healthier, more whole food plant-based food options, espeically as snacks! While fitting fruits and veggies into my meal times is easy, I often find myself turning to unhealthy vegan options when it comes to snacking.

    These apricot energy bites contain just 4 ingredients and take about 10 minutes to make. They’re delicious and so good for you! While they’re not exactly sugar-free, all the sugars are natural ones from the dried apricots, so infinitely better than the bar of Bourneville I would normally have sat down with at this time of day…

    This recipe is great because the chia seeds are blended, which makes them way easier for your body to digest and means you get so many great health benefits from them! You can check out some of the benefits of chia seeds in our blog all about them here.


    Recipe

    Yield: 12

    Total Time: 10M

    Ingredients:

    For the cake:

    • 1 cup / 200g organic dried apricots

    • 2 tbsp desiccated coconut

    • 1 tbsp chia seeds

    • 1 tsp vanilla essence

    Method:

    1. Place all your ingredients into a blender or food processor and blend until broken up and clumping together

    2. Using the palms of your hands, form the mix into small balls, I got 12 out of my mix, but if you want them slightly smaller then obviously you’ll get more!

    3. Store in an airtight container for up to a week.


    I told you this one was quick and easy! You could also roll them in desiccated coconut after shaping them if you wanted to take away a bit of the stickiness from the apricot.

    What did you think of this recipe? Did you do anything differently? We’d love to hear from you in the comments below. Don’t forget that you can share all your foodie makes with us using the hashtag #HBivore.

    Follow us on Facebook and like us on Instagram to keep up to date with our latest recipes, news and content. You can also use the form below to receive all our news straight to your inbox each week.


    Written by Amy Northwood
    Her-Bivore
    My passion for food and conservation has led me to where I am now! My aim is to show people that veganism can be diverse, tasty and adapted to fit every lifestyle and budget!
    You can find me on Instagram

    Amy Northwood - Her-Bivore

    Stay up to date with all our latest articles
    • This site is protected by reCAPTCHA and the Google Privacy Policy and Terms of Service apply.

  2. Marbled Coffee Cake

    Marbled Coffee Loaf Cake

    I absolutely love this coffee cake, it's a delicious treat that's not quite as sweet as a lot of the other cake options out there, the icing on the top is completely optional and can be left out if you’re not a huge fan of icing.

    The recipe is completely beginner friendly, and doesn’t have any unusual ingredients you've never heard of, so the chances are you have everything in the cupboard to make it now. The apple sauce works as the egg replacement from traditional recipes.

    This is the perfect option for having with a cup of tea in the afternoon with friends, the moist light sponge will have everyone going back for another slice!


     marbled coffe cake indoors


    Recipe

    Yield: 10

    Total Time: 1H

    Ingredients:

    For the cake:

    • 1 cup / 250ml non dairy milk

    • 1 tbsp smooth apple sauce

    • â…“ cup / 80g golden caster sugar

    • ¼ cup / 60ml oil

    • 1 tsp vanilla extract

    • 2 cups / 300g self raising flour

    • Pinch of salt

    • 1 tbsp instant coffee granules mixed with 2 tbsp hot water

    For the icing:

    • ½ tsp coffee granules

    • 1 tbsp hot water

    • ¼ cup icing sugar

    Method:

    1. Line a 2lb loaf tin with a loaf liner or baking parchment, and preheat your oven to 180c / gas mark 6.

    2. In a large bowl, mix together all your cake ingredients except for your coffee mix and self raising flour.

    3. Once combined, mix in your flour, and then transfer into your prepared loaf tin.

    4. Pour in your coffee, and then swirl around with a teaspoon until it is distributed throughout the mix, but not fully mixed in, this will create the marbled effect!

    5. Bake for 40-50 minutes, or until a cocktail stick inserted into the middle of the cake comes out clean.

    6. You’ll need to leave it to cool completely before icing. Once cooled, mix your coffee and hot water together and then mix in your icing sugar. You want your icing to be pourable but thick, you might need to add either more icing sugar or water to get the right consistency.

    7. Use a teaspoon to ‘flick’ the icing over the cake, creating the lines. Leave to set before serving.


     This recipe is a quick and easy one, but oh so delicious. I might try adding in some chocolate chips next time!

    What did you think of this recipe? Did you do anything differently? We’d love to hear from you in the comments below. Don’t forget that you can share all your foodie makes with us using the hashtag #HBivore.

    Follow us on Facebook and like us on Instagram to keep up to date with our latest recipes, news and content. You can also use the form below to receive all our news straight to your inbox each week.

    Written by Amy Northwood
    Her-Bivore
    My passion for food and conservation has led me to where I am now! My aim is to show people that veganism can be diverse, tasty and adapted to fit every lifestyle and budget!
    You can find me on Instagram

    Amy Northwood - Her-Bivore


    Stay up to date with all our latest articles
    • This site is protected by reCAPTCHA and the Google Privacy Policy and Terms of Service apply.

  3. Fashion Blog Photo resized (1)

    Vegan Fashion

    Transitioning to veganism is about more than just changing your eating habits. It’s about removing animal exploitation from your life all together, and this includes making vegan fashion choices.

    We believe there is no point In simply throwing out any fashion items you already have that aren't vegan. You can either wear them until they’re worn out, or consider giving them to a friend or family member, or donating to a local charity shop.

    Vegan fashion doesn’t have to be expensive, and thanks to so many companies already swapping leather and wool for vegan alternatives, it can be easy to find.

    What to Look Out For

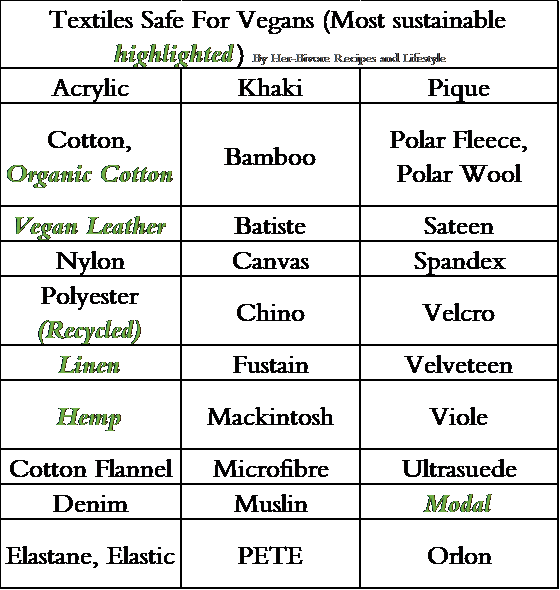
    It can seem overwhelming with so many different material names to learn and look out for, so I’ve made a table of those commonly found and safe for vegans!

    Those which are most sustainable and environmentally friendly have been highlighted green, as we all want to do the best we can for the planet we share!

     sustainable fabrics table

    Many vegan products can be found in everyday clothes shops you’d find on the high street, with brands like H&M and GAP going completely fur-free.

    If you’re after something a little more special and you want to support fully vegan businesses, here are some of my favourites:

    Ethics - a UK based ethical vegan clothing company.

    HeartCure Clothing - UK based but ships worldwide. ‘For change markers, life savers and earth lovers’

    Mud Jeans - Upcycled and recycled jeans, ships worldwide.

    Willowkind - Sustainable, organic, cruelty-free fashion for babies, kids and adults.

    These are a few of my favourites, but what about you? Let us know of any great ethical vegan clothing and fashion brands we’ve missed in the comments below! We love to hear from you!

    Follow us on Facebook and like us on Instagram to keep up to date with our latest recipes, news and content. You can also use the form below to receive all our news straight to your inbox each week.

    Written by Amy Northwood
    Her-Bivore
    My passion for food and conservation has led me to where I am now! My aim is to show people that veganism can be diverse, tasty and adapted to fit every lifestyle and budget!
    You can find me on Instagram
    Amy Northwood - Her-Bivore

    Stay up to date with all our latest articles
    • This site is protected by reCAPTCHA and the Google Privacy Policy and Terms of Service apply.

  4. Barbeque Jackfruit Quesadillas

    So I woke up this morning with no idea what to cook for dinner tonight.

    I scrolled and scrolled for inspiration when I came across some quesadilla recipes that needed veganising. I’ve never had a quesadilla before. I didn’t even know how to spell it until further research was done.

    Regardless of my lack of knowledge when it comes to tortillas, tacos, burritos, quesadillas etc. These were so easy to make and tasted delicious.

    While I was preparing these, a resident quesadilla expert came along and told me that I probably had too many ingredients for them. However, we’re going to skip over that fact, accept they are delicious and assume that whatever I made falls within the spectrum of what is a quesadilla.

    Here you go:


    Recipe

    Yield: 4 servings

    Total Time: 30M

    Ingredients:

    • 4 Tortilla Wraps

    • 120g barbecue sauce

    • 1 400g tin of jackfruit

    • 4 chestnut mushrooms

    • 1 medium white onion

    • 1 red bell pepper

    • 2 spring onions

    • 200g grated vegan cheese

    Method:

    1. Drain off your jackfruit and cut the core off the nice fleshy pieces, use two forks to ‘pull’ the fleshy pieces apart, removing any seeds you may find. Mix the flesh with your barbeque sauce. I used Jack Daniels BBQ sauce.

    2. Fry off your onions in a large pan until they’re browned. Then add your barbecue jackfruit mix, mushrooms and pepper. Heat through for a couple of minutes on a high heat and then remove from the stove.

    3. Spread your cheese over 1 half of your tortilla, then add your jackfruit mix, your spring onions and then another layer of cheese on top before folding over. Repeat for all 4.

    4. Place your quesadillas into a George Foreman grill or cook in a clean hot pan for around 5 minutes, then cut into three before serving.


    I told you they were easy. They take no time at all and make for a fantastic dinner or snack.

    You can also mix up the ingredients for whatever your preference. This would also work really well with soya mince and any combination of vegetables. If I had had some hot sauce in the cupboards, you could bet that I would have thrown that in too.

    We’d love to hear what you made your quesadillas with! Be sure to share all your foodie makes with us using the hashtag #HBivore.

    Follow us on Facebook and like us on Instagram to keep up to date with our latest recipes, news and content. You can also use the form below to receive all our news straight to your inbox each week.

    Written by Jack Ricketts
    -Him-Bivore
    Marketing has always been my career focus. I am striving to promote a plant-based lifestyle to the masses through positive campaigns and sharing the benefits of veganism. The animals, and the planet, need us more than ever to make a change. 
    You can find me on Instagram

    Stay up to date with all our latest articles
    • This site is protected by reCAPTCHA and the Google Privacy Policy and Terms of Service apply.


  5. Raspberry Bakewell Tart

    Vegan Bakewell Tarts seem pretty few and far between. The ultimate tease is going into the supermarket to find that they do a milk free, gluten-free everything free pack of bakewells, only to turn the packet over and see that they’ve gone and put eggs in it.

    Well I say “no more” my friends. After the incessant nagging from Amy that she wants bakewells and my anger at the lack of availability… I have come up with a recipe that works.

    I made mine with raspberries but of course, if you’re feeling traditional, then by all means go with cherry or any other flavour you want.

    This recipe is a little more difficult than some of the others I have done recently. The trick is to take your time and allow plenty of time for cooling between steps. 

    Without further ado:


    Recipe

    Yield: 8

    Total Time: 1H 30M

    Ingredients:

    For the pastry:

    • 1/2 cup / 125g plain flour

    • 1/4 cup / 55g icing sugar

    •  1/4 cup / 55g vegan margarine

    For the frangipane:

    • ½ cup / 125g dairy-free spread

    • â…“ cup / 80g golden caster sugar

    • ¾ cup / 75g ground almonds

    • 1tbsp plain flour

    • 1 lemon zest

    • 1tbsp chia seeds

    • 3 tbsp water

    For the topping:

    • 2 cups / 300g icing sugar

    • 6 tbsps water

    • 5 raspberries

    Method:

    1. For the pastry, put your flour and icing sugar in a large bowl then add your butter. using your hands, rub the mix until it forms course breadcrumbs. Bring the mix together into a ball till it's all combined, if youre mix is too dry, add a tsp of water at a time until it comes together.

    2. Clingfilm your pastry ball and place your pastry into the fridge for 10-15 minutes before you use it.

    3. Preheat your oven on 180C and find yourself a 7.5 inch round baking tin or dish.

    4. Lightly dust a work surface with flour and roll out your pastry mix. Lift the mix on top of your rolling pin and spread across the top of your tin. Work it into the edges of the tin and then trim off any excess.

    5. Lightly prick the surface of the pastry with a fork all over the base (this stops it rising) and loosely cover with baking parchment. Fill with baking beans (or rice if you don’t have any) and bake for 15 minutes.

    6. In the meantime, to make your frangipane, mix together your dairy-free spread and sugar until it’s light and fluffy. You’d be best using an electric mixer for this.

    7. Add in the rest of your frangipane ingredients and mix until combined.

    8. Spread your jam across the base of your pastry case. Leave about 1cm of space between the edges. Place 5 or 6 raspberries on top of the jam and press them down.

    9. Spread your frangipane into your pastry case. Carefully even it out with a spatula.

    10. Bake for a further 25-30 minutes until the frangipane looks golden. You can test to see if it’s done by pushing a skewer into the center and seeing if it comes out clean. You’ll need to leave it to cool completely before moving onto the icing.

    11. Mix the icing sugar together with the water. Keep 2 tablespoons of the icing aside in a small bowl for the raspberry decoration.

    12. Pour your icing over the tart and smooth it over using the back of a spoon to push it to the edges.

    13. Mash up one raspberry with your remaining icing sugar until it is smooth and pink, then cut a tiny hole in the end of a piping bag and pipe your raspberry icing in straight lines across your tart about 1 inch apart. Then, gently pull a cocktail stick through your lines to create the feathered pattern.

    14. Finish by placing 4 raspberries in the center of your tart and wait for it to completely set before cutting and serving.


    This recipe certainly takes a lot of time and effort to get right, but it was worth it. Our craving for Bakewell was completely satisfied.

    What did you think of this recipe? Did you do anything differently? We’d love to hear from you in the comments below. Don’t forget that you can share all your foodie makes with us using the hashtag #HBivore.

    Follow us on Facebook and like us on Instagram to keep up to date with our latest recipes, news and content. You can also use the form below to receive all our news straight to your inbox each week.

    Written by Jack Ricketts
    -Him-Bivore
    Marketing has always been my career focus. I am striving to promote a plant-based lifestyle to the masses through positive campaigns and sharing the benefits of veganism. The animals, and the planet, need us more than ever to make a change. 
    You can find me on Instagram

    Stay up to date with all our latest articles
    • This site is protected by reCAPTCHA and the Google Privacy Policy and Terms of Service apply.