Her-Bivore Blog

 RSS Feed

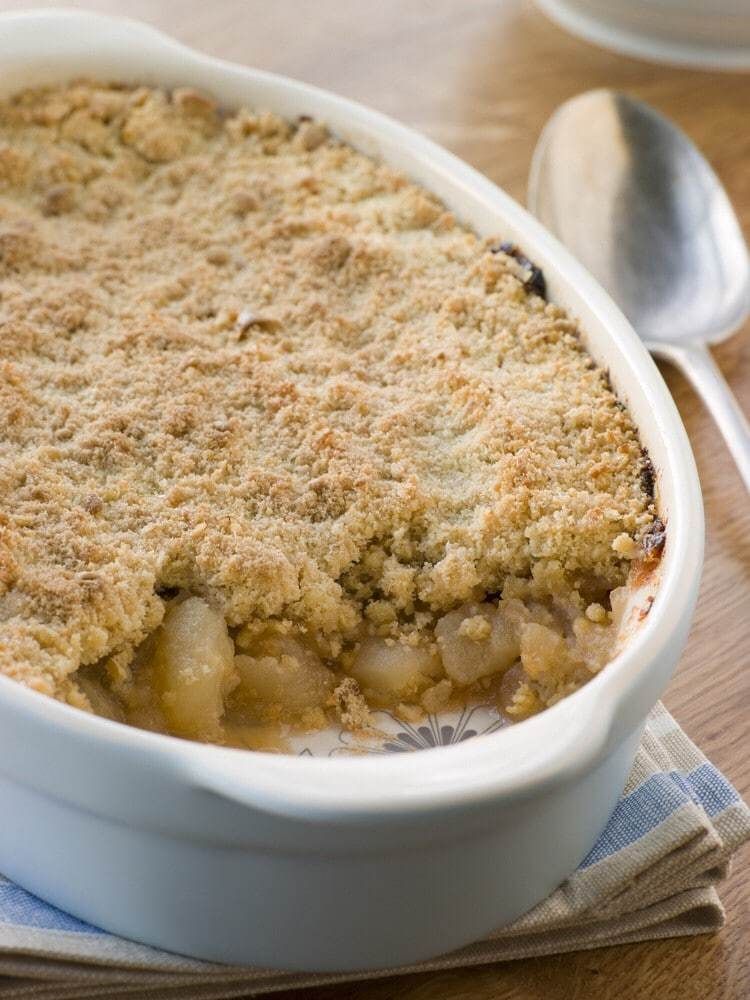
  1. Bramley Apple Crumble served in a crash dish next to a spoon.

    Growing up, there would always be an apple crumble on the dinner table for pudding. It’s one of those all-time classics.

    A crumble is easy enough to make, but also shows that you took the time to make a pudding, that you put love and care into it rather than heading to the shops and buying something. That and, of course, it’s a firm favourite for most!

    Making the recipe vegan wasn’t really that much of challenge. I just swapped out margarine for an alternative. However, it’s one of those recipes that you simply have got to have for any occasion which is why I wanted to share it with you.

    I serve mine with Alpro vegan custard, but you could have it plain or even use a vegan cream. Depending on your taste, you can add whatever you like into this recipe to make it yours. A tablespoon of cinnamon can work well or also adding in other fruits to your apple mix.

    You could also try sprinkling some sugar and oats on top of the crumble before you bake it for a crispier and more oaty flavour.

    I can’t say that this would work with gluten-free flour as I haven’t had the chance to try it yet. If you do give it a go, I’d love to hear about how it went!


    Recipe

    Servings: 4

    Total Time: 45M

    Ingredients:

    • 3 medium bramley apples

    • 175g + 1tbsp plain flour

    • 110g + 3tbsp golden caster sugar

    • 110g vegan margarine cut into cubes

    Method:

    1. Peel and core your apples, then slice into 1cm thick slices. Add your 1tbsp of plain flour and your 3 tbsp of caster sugar and toss well, being careful not to mush up your apple.

    2. In a mixing bowl, place your margarine and your remaining sugar and flour. Rub the mix between your hand to break up your margarine and mix with your dry ingredients, your mix should start to form the consistency of large breadcrumbs. Don’t overwork the mix otherwise you will melt the margarine.

    3. Place your apples into a 9 x 9 inch ceramic baking dish and spread out evenly, then pour your topping mix over evenly, but don’t press it down.

    4. Cook at 170c for 30-40 minutes or until your topping is golden brown. Remove from the oven and serve with your favourite vegan custard or cream.


    It’s as simple as that! It’s easy enough to prepare and it’s no trouble to bake in the background while you work on preparing dinner.

    No matter the occasion, this dessert is a great way to show you went to the effort. It’s hard to beat!

    How did you make yours? I’d love to hear about your creations. Be sure to share anything with us on the #HBivore hashtag on Instagram.

    Don’t forget, you can follow us on Facebook and like us on Instagram to keep up to date with our latest recipes, news and content. You can also use the form below to receive all our news straight to your inbox each week.

    Written by Amy Northwood
    Her-Bivore
    My passion for food and conservation has led me to where I am now! My aim is to show people that veganism can be diverse, tasty and adapted to fit every lifestyle and budget!
    You can find me on Instagram

    Amy Northwood - Her-Bivore

    Stay up to date with all our latest articles
    • This site is protected by reCAPTCHA and the Google Privacy Policy and Terms of Service apply.

  2. Image Of The YouTube Homepage

    There seems to be a lot of vegan YouTubers renouncing the lifestyle at the moment.

    It can be extremely disheartening to see, and also damaging to the vegan movement itself. These people have built up a following that believes in the work we are trying to do; they have positioned themselves as vegan role models to the masses.

    Needless to say, when they suddenly turn their back on the fundamental vegan beliefs, it certainly deals a blow to everyone who followed them.

    When many people have respect for these YouTubers, it may cause some people to question veganism. We listen to the justifications of their decision and try to see it from their perspective. That’s what these YouTubers are there for when you think about it. We want an insight into the lives of these people, so we can’t help but try to relate.

    The first thing to remember is the difference between vegan and plant-based, many of the YouTubers were simply following a plant-based diet, but often use the word vegan in order to obtain more views, especially if they make a video about why they’ve ‘stopped being vegan’.

    The Health Scares

    The predominant reason that is given for renouncing veganism is the supposed negative impacts the diet has had on their health, despite for many years there being a stereotypical idea that vegans are the epitome of health.

    They may not be lying - they may have lost hair, chipped teeth, hit an unhealthy weight etc, while on a plant-based diet.

    It needs to be clarified that the drastic impacts these people are seeing in their health, are due to them suffering the effects of an ‘unbalanced’ diet, which thousands of people struggle with every year, regardless of their diet.

    One of our main objectives here at Her-Bivore is to promote that a healthy vegan lifestyle is obtainable and provide the latest information to make it very much accessible for everyone.

    There are no nutrients you can’t get from a vegan diet, with the exception of vitamin B12, but this is also a risk for omnivores due to irrigation practices in recent times. We explained this in a previous post that you can read here.

    There are a number of fad diet trends that fall within the scope of a plant-based diet, such as the raw food diet and the juice cleanse diet. These, if not done properly, can cause such health issues.

    I’m not saying they can’t be great for your health, but they have to be thought about and often planned to ensure all the required nutrients and food groups are being obtained.

    I recently came across this video that sums this up perfectly.


    The Important Thing To Remember

    While it is intensely frustrating - those that have given up veganism, were not ever vegan in the first place.

    Veganism extends much further than what you choose to put in your belly. It is a lifestyle of compassion and change.

    Those that have truly adopted a vegan lifestyle don’t ever look back. The reasons for their choice run so much deeper than their own self. It is a choice for the lives of billions of animals, and the planet.

    If there is something that isn’t working in their diet, they find ways to make it work, they address the situation and realise that there are thousands of other vegans worldwide that are doing just fine and have done so for years.

    Community Over Influencers

    If you find that someone you follow has suddenly changed their beliefs for their sake of self, don’t let this take a toll on you.

    Take a break from YouTube and come and hang out with other vegans either online or in your local community.

    Sites like Eventbrite will turn up results near you for vegan events that you can attend. If, by chance, there aren’t any - take the chance to set one up yourself! There will be vegans near you and it’s a fantastic opportunity to meet likeminded people such as yourself.

    Alternatively, there are literally hundreds of vegan Facebook groups that you can join in just a few clicks. Each strives to create a supportive environment that allows you to share what’s on your mind without judgement.

    A couple I really like at the moment are One Billion Vegans, which is just packed full of thought-provoking conversations and questions. The other is Rate My Vegan Food (which can be a little edgy sometimes but good for a laugh - you’ve been warned!). 


    While it has been a bit doom and gloom, I hope you find something useful from this article and hopefully it has given you some ideas as to where you can turn next!

    What are your thoughts on the matter? Have you actually witnessed this happen with any YouTubers you follow? We’d love to hear from you in the comments below.

    Remember, you can follow us on Facebook and Instagram to keep up to date with our latest recipes, news and content. You can also get our updates delivered straight to your inbox by signing up to our weekly newsletter using the form below.

    Written by Jack Ricketts
    -Him-Bivore
    Marketing has always been my career focus. I am striving to promote a plant-based lifestyle to the masses through positive campaigns and sharing the benefits of veganism. The animals, and the planet, need us more than ever to make a change. 
    You can find me on Instagram

    Stay up to date with all our latest articles
    • This site is protected by reCAPTCHA and the Google Privacy Policy and Terms of Service apply.


  3. Quiche top view


    Vegan Savoury Quiche

    Quiche was something I never ate much as an omni, so I can't really remember what it tasted like! All i can do is promise you that this vegan quiche is absolutely delicious, and you won’t regret making it! 

    I love quiche as a nice light meal on a summer's day, served with a big crispy salad and maybe even some new potatoes if I'm feeling fancy.

    In the recipe I’ve put to use a food processor for blending your tofu, but I’ve actually made this one with a food mixer too and it works fine! You don’t get a mix quite as smooth, but if you turn your mixer up nice and high it will break up the tofu and blend it all together just fine.

    I didn’t specify a flavour on this blog title, because you really can just fill it with whatever you like! I want to make one with the Vivera bacon pieces… but I love a purely plant based one too! I kept things simple with tomato and spring onion, but whatever you have around would work too! 

    Here’s some extra ideas:

    • Broccoli and asparagus

    • Quorn smoky ham style slices and  vegan cheese (Applewood would be amazing!)

    • Bell pepper and leek

    • Butternut squash and kale

    • Tomato and basil

    • Spinach, mushroom and pea

    • Caramelised onion and courgette

    You get the idea, make it however you want!

    This is also a great way to boost your protein for the day, as one block of tofu has a whopping 50g of protein (based on cauldron extra firm tofu).

    I used an 18cm tart dish for mine, but you can use slightly bigger, or even make individual quiches if you like!

    Make sure you let me know what flavours you put together in the comments below, and as always share photos of your foodie makes with us on instagram

     Quiche side view crust on


    Ingredients

    Crust:

    • 250g/ 2 cups plain flour

    • 125g/ 0.5 cups vegan margarine, cold from the fridge

    • 2 tbsp water

    Filling

    • 1 block firm tofu

    • 2 heaped tbsp nutritional yeast

    • ¾ cup  / 180ml cup unsweetened plant milk

    • 2 cloves garlic

    • Salt and pepper to taste

    • 12 cherry tomatoes, cut into halves

    • 3 spring onions, cut into rings

    Method:

    1. Preheat the oven to 180c. To make the crust, gently mix together your plain flour and vegan margarine on an electric mixer, then add your water a tablespoon at a time. If your mix still isn't coming together, you can add a little more water, but be careful not to make your dough soggy, you want it soft enough to work with but not so soft it’ll break!

    2. You can either use a loose bottom dish or a ceramic quiche dish. Roll out your pastry to about half a cm thick and about 2 inches bigger than your dish, then gently place into the tart dish, and use your fingers to carefully push the pastry into the sides, but be careful not to stretch it. You want to leave the extra pastry hanging over until it’s all fully cooked, filled and recooked.

    3. Take a piece of baking parchment just bigger than your dish, and scrunch it up in your hands, this will make it easier to work with. Place into your tart case and then fill with baking beans or uncooked rice (this will keep the shape of your quiche case while it cooks)

    4. Cook for about 20 minutes, or until the pastry is cooked, then remove from the oven, place to one side to cool.

    5. While your pastry case is cooking, fry off ¾ of your spring onion with 8 of your tomatoes (that’ll be 16 halves until they're soft and browned.

    6. Drain your tofu, and squeeze out any excess water over the sink, then in a food processor, combine your tofu, nutritional yeast, garlic, plant milk, salt and pepper until smooth.

    7. Move your tofu mix into a large bowl, and then gently mix in your cooked spring onions and tomatoes. Once combined, tip the mixture into your tart case (you might have a little extra mix depending on your pastry size and shape) and use a spatula to even out. Top with the remaining halved cherry tomatoes and spring onions then bake for about 30-40 minutes until golden brown.

    8. Leave to cool for a few minutes before serving. Once cooled, this quiche is great to eat cold too and will last for 3 days in the fridge!


    We hope you loved this quiche as much as we did, and we’d love to see what you come up with! Remember that you can share your foodie makes with us using the hashtag #HBivore.

    Follow us on Facebook and like us on Instagram to keep up to date with our latest recipes, news and content. You can also use the form below to receive all our news straight to your inbox each week.

    Written by Amy Northwood
    Her-Bivore
    My passion for food and conservation has led me to where I am now! My aim is to show people that veganism can be diverse, tasty and adapted to fit every lifestyle and budget!
    You can find me on Instagram

    Amy Northwood - Her-Bivore

    Stay up to date with all our latest articles
    • This site is protected by reCAPTCHA and the Google Privacy Policy and Terms of Service apply.
     

  4. whole cheezecake top view

    It’s taken a long time to be able to bring you this recipe, but it’s finally here, well overdue! We made a cheezecake.

    Not just any old cheezecake either; it’s a Lotus Biscoff Cheezecake, because if you’re going to bother, you may as well go all in!

    This tasted absolutely amazing and thanks to Amy’s housemates, it was gone before I could even get round to second helpings. It’s fine… I’ll get over it.

    A couple of notes before you begin, because although this looks tasty:

    1. I started making this midday on Saturday and it was ready to eat midday on Sunday

    2. My wallet was a heck of a lot lighter after picking up the ingredients.

    3. You get quite a cashew and coconut flavour, so if you don’t like these flavours, this probably isn't for you.

    It’s definitely only a special occasion kind of pudding but it’s guaranteed to be a hit. We were going to count ordering pizza as our excuse for a special occasion, but it disappeared before we had chance...

    So if you have a whole load of patience and money to burn, here’s the recipe:


    Recipe

    Yield: 8 portions

    Total Time: 1 Day

    Ingredients:

    For the base:

    • 10 Lotus biscuits

    • 10 pitted dates

    • 1 cup desiccated coconut

    For the cheezecake:

    • 14oz (400g) whole cashew nuts

    • 1 cup coconut oil

    • ¾ cup maple syrup

    • ¼ cup lemon juice

    • ½ cup water

    • 1tsp vanilla

    For the topping

    • ½ tub Lotus Biscoff spread

    • 4 Lotus biscuits to decorate

    Method:

    1. Empty your cashews into a bowl and cover with boiling water. Leave for 7-8 hours.

    2. To make the base, put your ingredients into a blender and blitz them until they start to clump together. Line the base of a spring-form pan with baking parchment and grease the edges with dairy-free spread. Press your mixture firmly into the bottom with the back of a spoon to level it out evenly. Place in the freezer to firm.

    3. Once your cashews are fully soaked, put your cheezecake ingredients together in a blender and blitz until smooth. Take your base out from the freezer and slowly pour your mixture in. Smooth the surface with a spoon or spatula and place again in the freezer for another 7-8 hours, I left mine overnight.

    4. When you are ready, pop open your spring-form pan and carefully take out your cheezecake.

    5. Gently warm your Biscoff spread in a bowl in the microwave until it reaches a gooey consistency, this will only take about 10 seconds, you don't want it getting hot. Evenly spread over the top of your cheezecake.

    6. You can then crumble more biscuits over the top however you choose. Make sure it is fully defrosted before you start to tuck in!


    There you have it. It’s funny because this recipe is actually really simple - It just takes so long to actually make when you consider all the waiting times!

    Biscoff is only one of the many options you can choose to make a cheezecake with. You could have caramel, fudge, fruit, matcha… the list goes on. If you’re feeling brave, why not try a variation! We’d love to see what you make. Don’t forget, you can share all your foodie makes with us on the hashtag #HBivore

    Follow us on Facebook and like us on Instagram to keep up to date with our latest recipes, news and content. You can also use the form below to receive all our news straight to your inbox each week. 

    Written by Jack Ricketts
    -Him-Bivore
    Marketing has always been my career focus. I am striving to promote a plant-based lifestyle to the masses through positive campaigns and sharing the benefits of veganism. The animals, and the planet, need us more than ever to make a change. 
    You can find me on Instagram

    Stay up to date with all our latest articles
    • This site is protected by reCAPTCHA and the Google Privacy Policy and Terms of Service apply.

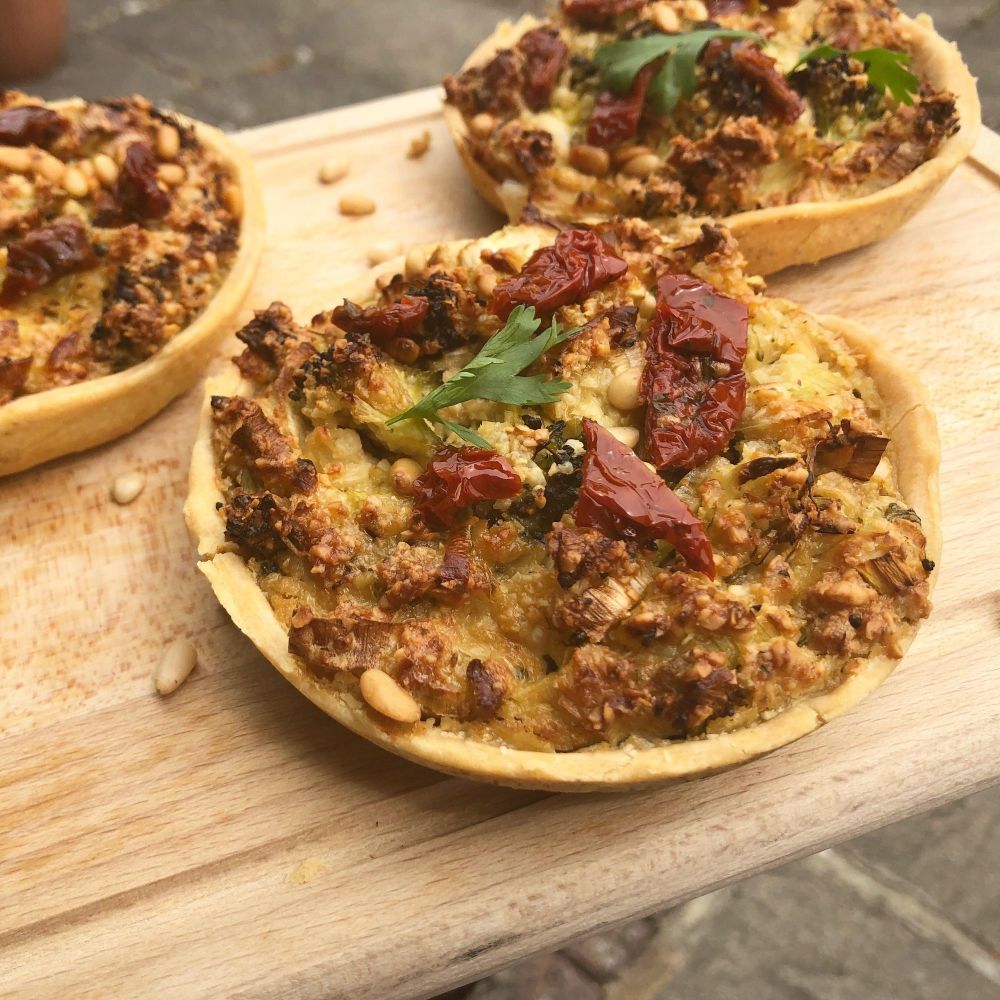
  5. cashew ricotta dna broccoli tarts

    Jump to Recipe >>

    Tarts are so easy to make but never fail to impress, I find they’re the perfect starter for a dinner party or a fancy homemade dinner, or simply have two served with salad as a delicious light meal.

    When Amy and I used to work at a restaurant together, there weren’t very many vegan options available. Except only for tarts - so we both grew quite fond of them.

    Naturally, we had been meaning to create our own tartlet recipe. I’ve been experimenting with all different pastries (filo, shortcrust and puff) and all sorts of fillings - so I’m sure these will just be the start of our recipes of tarts and tartlets. This was a great first choice as we were keen to try out this amazing, new, vegan ricotta recipe in it!

    You can either soak your cashews in cold water for an hour or, if you’re pushed for time, just cover them with boiling water for 5 minutes. The cashews blend up to produce a great tasting vegan cheese, similar to ricotta, but at just a fraction of the price. One reason I love making my own products as much as possible is so that I know exactly what is going into them.

    Anyway, without further ado: 


    Recipe

    Yield: 4 Individual Portion Tarts

    Total Time: 30M

    Ingredients:

    • 2/3 cup / 100g of cashews

    • 1/2 head of broccoli

    • 1/2 cup / 25g sun dried tomatoes, finely chopped
    • 1 medium leek, chopped into rings

    • 1 tbsp lemon juice

    • 2 tbsp nutritional yeast

    • 1/3 cup / 80ml cold water
    • 1 tsp garlic powder

    • 1 tsp celery salt

    • pinch of oregano

    • pinch of basil

    • pack of shortcrust pastry (Check the label, I used JusRol, or you can make your own here.)

    • oil

    • 1/4 cup / 35g pine nuts (sunflower seeds, pumpkin seeds, breadcrumbs or soya nuts would also work)

    Method:

    1. To make the ricotta - put the cashews in a bowl and cover with boiling water. Leave for 5 minutes to soak.

    2. Drain off the water and put your cashews in a food processor with the lemon juice, nutritional yeast, garlic powder, celery salt, oregano, basil and your cold water and blend until smooth.

    3. Cut the florets off of your broccoli fairly small and place into a small frying pan with your leek and cook off with a small drizzle of olive oil on medium heat for a few minutes until the broccoli is nearly cooked, then turn off the heat and leave to one side until needed.

    4. Lay out your pastry and allow to warm to room tempature, if you're rolling your own, you want it nice and thin. Cut into square large enough to cover your tart cases, then gently press into the cases and then trim any extra.

    5. Mix your broccoli mix, sun dried tomatoes and ricotta in a bowl and spoon the mixture into your tart cases and then top with your chosen nuts of seeds. using a small pastry brush, coat the edges of your pastry with oil to help them brown in the oven.

    6. Bake in the oven for about 20-25 minutes and serve. We served ours with a side salad and red onion chutney.


    We really enjoyed making these (and eating them!). Obviously, there’s lots of room to experiment with this recipe. You could try different fillings and different toppings in any combination. I’m looking forward to trying out a spinach version next.

    We’d love to see what you come up with! Remember that you can share your foodie makes with us using the hashtag #HBivore.

    Follow us on Facebook and like us on Instagram to keep up to date with our latest recipes, news and content. You can also use the form below to receive all our news straight to your inbox each week.

    Written by Jack Ricketts
    -Him-Bivore
    Marketing has always been my career focus. I am striving to promote a plant-based lifestyle to the masses through positive campaigns and sharing the benefits of veganism. The animals, and the planet, need us more than ever to make a change. 
    You can find me on Instagram

    Stay up to date with all our latest articles
    • This site is protected by reCAPTCHA and the Google Privacy Policy and Terms of Service apply.