Her-Bivore Blog

 RSS Feed

  1. tofu

    The Essential Guide to Cooking with Tofu

    Tofu is a sorely misunderstood food, with somewhat of a bad reputation. Many people see tofu as a spongy, flavourless health food eaten only by the strictest of vegans. 

    That couldn’t be further from the truth, many people simply jump into cooking tofu without doing their research, so they don’t know how to use it properly! 

    The blandness of tofu is one of its finest traits, this means it can be flavoured in hundreds (probably thousands) of different ways, to suit whatever type of dish you want to create.

    According to legend, tofu originated in China about 2000 years ago when a Chinese cook accidentally curdled soy milk when he added nigari seaweed. Shocking to know that it wasn’t invented by some hipster in their one bedroom apartment, right?

    Tofu has since become a popular food across the world, particularly in asian cultures where it is fried, dried, frozen, fermented or even used in soups.

    Before we get into the best ways to prepare and use your tofu, it’s important to understand that there is more than one type of tofu available to buy from your local supermarket, health food shop or asian food store. There are 3 main types of tofu you're likely to come across in recipes and on store shelves:

    Types of Tofu

    • Silken Tofu - Silken tofu is soft, creamy and blendable. It’s often used for desserts, puddings, sauces or even smoothies. (Silken tofu is great for making vegan cheesecakes!)

    • Medium Tofu - A nice middle ground, denser than silken tofu but still delicate. Commonly used in soups or miso.

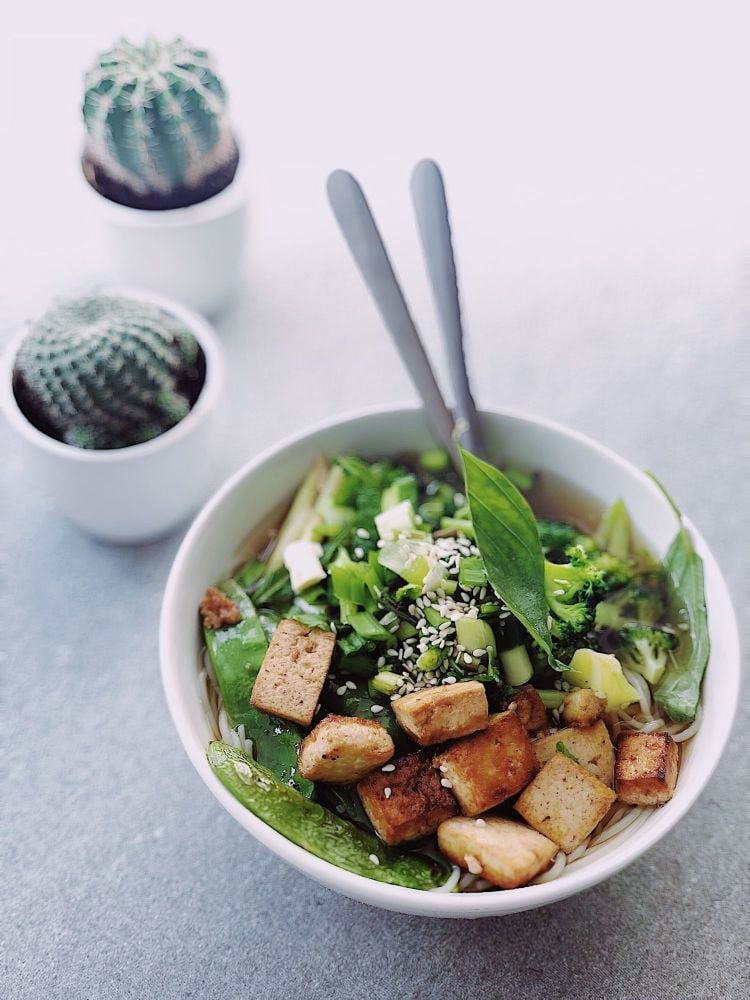
    • Firm Tofu - Your best friend when you’re just starting out with tofu. A firmer tofu, great all rounder for cooking uses. Absorbs flavours. Great for stir frying, oven baking, pan frying or making tofu scramble.

    Preparation

    Unfortunately tofu isn't as simple as just taking it out of the packet and using it, however the preparation is minimal and extremely easy, and it’s vital to achieving delicious, flavourful tofu. 

    You’ll notice that your tofu comes in a sealed pack full of liquid, so opening it over the sink with a pair of scissors is usually the least messy option. You’ll then want to drain all the liquid away, and press your tofu. I cannot stress enough how important this step is. Regardless of which type of tofu you are using, and what the end result is going to be, you always need to press your tofu. 

    You can buy a fancy tofu press online, but if you’re like me and already have a kitchen full of gadgets and a bank account screaming at you to stop buying things, you can easily press your tofu at home with no specific equipment. 

    Simply wrap your tofu in a clean kitchen cloth, or place it between a few clean pieces of kitchen roll, and then weigh it down with a large cookbook or something else heavy. This will push the water out, and the cloth will absorb it. There’s no set time for how long you need to press your tofu for, but 20-30 minutes is generally a good shout.

    Marinade

    This next step is really going to apply to the use of firm tofu, if you're using silken tofu, at this point you usually just follow what the recipe says, you’ll probably be blending it up with a load of delicious flavours anyway, so you don’t need to worry about adding anything beforehand.

    Whatever savoury dish you’re planning to use your tofu for, the chances are you’ll want to add some flavour, and soaking your tofu in a marinate is the best way to do this. You’ll want to marinade your tofu for as long as possible, I often do mine the day before and leave it to marinade in the fridge overnight. This gives it plenty of time to really absorb all the flavour.

    You’ll also want to cut your tofu into the size and shape you want it before you marinade it. This created a bigger surface area for the flavours to stick to. There’s no set rule for this, but for salads and stir frys, I like to cut them into 2x2cm squares, and for poke bowls or wraps into fingers. 

    There are ENDLESS options for tofu marinades, and if you pop into google what type you're looking for… barbeque, mexican, sweet, asian, spicy… you’ll find something perfect for your creation.

    Of course you can also create your own tofu marinade, by throwing together whatever you think will work. As a general guideline you need one of each of the following:

    Fat - to help bring everything together and get your tofu nice and crispy when its cooking. E.g: Sesame oil, olive oil, soya yoghurt, coconut milk, peanut butter or other nut butters or oils.

    Acid - Allows all the ingredients to mix properly, because the water in the tofu won’t like the oil otherwise! E.g: lemon, lime, orange, wine, balsamic vinegar, apple cider vinegar, hot sauce, liquid smoke, soy sauce, teriyaki sauce, miso paste, maple syrup, agave, sugar, molasse, date syrup.

    Aromatic - for a deep flavour, and a mouth watering aroma. E.g: onion, garlic, ginger, nutritional yeast, thyme, basil, rosemary, oregano, paprika, cumin, coriander, sage, sesame, parsley, wasabi, tarragon, turmeric.

    While not all these combinations will go together, don't misjudge the power of using two contrasting flavours to create something unique and delicious. Also make sure you let me know what marinades you come up with in the comments below, and tag us in your foodie makes on instagram.

    Cooking

    Now for the pièce de résistance, you’ve worked hard to this point, you've drained, pressed and marinades your tofu. Now it's time to cook it. You probably know at this point how you want to cook it, but as a general rule, how you cook it depends on what kind of dish it’s going into. 

    Baking - this is perfect for salads, wraps and sandwiches.Place your tofu into a lined baking tray, and pour over any excess marinade you have left, although you don’t want it to be swimming! Bake at about 200c for 25-30 minutes or until its crispy and golden brown, turn once during cooking for a nice even bake.

    Stir fry - Stir frying tofu is exactly what you would expect, you just add it to a hot pan and cook! Ensuring all sides get even pan time. It’s best to cook tofu on its own though, and then add it at the end, otherwise it has a tendency to fall apart when it gets knocked around by the other ingredients.

    Scrambled - If you’ve never had tofu scramble, you need to. It’s a great breakfast option on toast, or a must have for a breakfast burrito. This ones a bit more in depth, so I’ll just point you in the direction of the recipe for it, which you can find here.
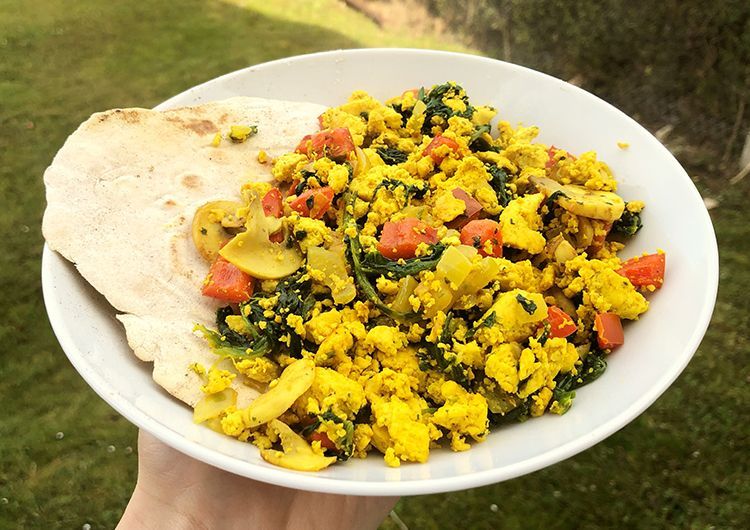
    tofu scramble

    Air Fryer - Simply whack your tofu into a preheated air fryer at about 130c. Cook for 15-20 minutes, shaking at about 10 minutes so it cooks nice and evenly.

    Griddle -  Another ‘exactly what it says on the tin’ option. Your marinade will crisp up amazingly on a preheated griddle pan, and you’ll get the added lines of crispiness. This is perfect for topping salads.

    Barbeque - Tofu makes for a great option for barbeques. I like to make tofu and vegetable skewers and marinade the whole lot. Then simply place them on the edge of your barbeque so you can easily turn them, and cook until your veggies are cooked! I recommend mushrooms, fresh vine cherry tomatoes and pepper.

    Now that you’ve become a tofu master, your food choices have probably doubled. Tofu makes a great healthy way to pack a meal full of protein, with one cup providing more than 20g of protein. 

    Make sure you let me know what you get up to with your tofu, tag us in your recipes and share your tofu hints and tips in the comments below so we can all learn from each other!


    Written by Amy Northwood
    Her-Bivore
    My passion for food and conservation has led me to where I am now! My aim is to show people that veganism can be diverse, tasty and adapted to fit every lifestyle and budget!
    You can find me on Instagram

    Amy Northwood - Her-Bivore


  2. banana oat cookies

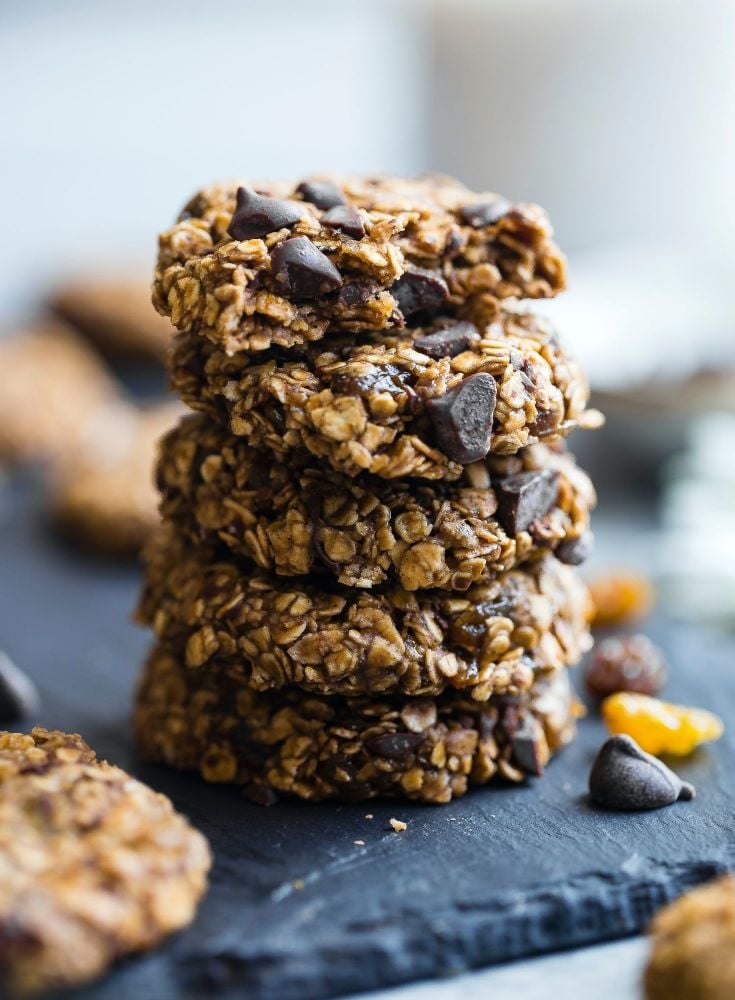
    Banana Oat Cookies

    Jump to Recipe>>

    If there's one thing to learn about me in this blog, it’s that i'm great at buying bananas, but terrible at actually eating them.

    I always buy them with the good intention of having them with breakfast or making them into smoothies, but by the time I remember they’re there breakfast is long gone and I realise I have absolutely nothing else to put into a smoothie.

    I watch them sit on the kitchen side, patiently waiting, first they get little brown spots, and then one day you wake up and BAM, they’re more brown than yellow. Someone once told me that the healthiest time to eat a banana is when they’re brown, but i don't know how much truth there is to that.

    Regardless, I suppose if you’re putting them into banana bread or baking them into these delicious oat cookies then the health benefits are a little bit to be desired.

    That said, these aren’t the worst snack for you, and the oats provide a great slow release energy making them ideal for a breakfast or morning snack (and certainly one I won't have trouble remembering to eat!).

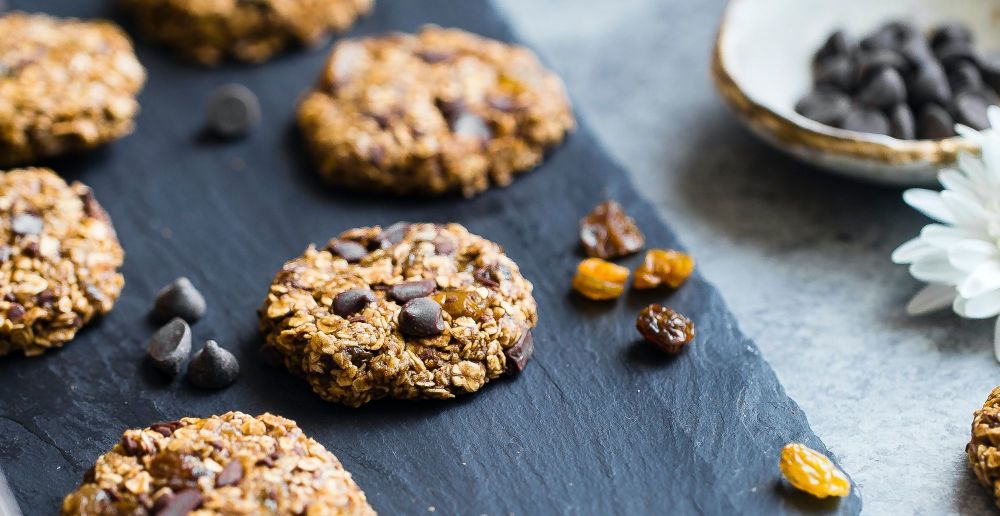
    What i love about this recipe is that you can change out the chocolate chips for something else if you’d prefer. They work great with raisins, cranberries, nuts, or even no added extra at all!

    As a tip, if you want the same gorgeous result as the picture, save a few of your chocolate chips for after they’ve come out the oven, and then simply sprinkle them over the top! 

    You can also make these a bit bigger if you prefer a bigger cookie (and who doesn’t?) but i tried to keep them as a nice lower calorie snack for when i'm feeling peckish. If you do make them bigger, remember they might need a little longer in the oven, but please be careful not to over bake, otherwise you’ll lose that soft chewy center.

    During the recipe, you’ll also notice that you leave the mix to sit for 15 minutes before adding your chocolate chips and shaping your cookies, this gives the oats a chance to absorb the moisture from the other ingredients, and means they’re nice and soft when they cook, improving the overall end result.

    If you live in a hot climate, your coconut oil will be ready to use from the cupboard. Here in the UK, the climate is too cold for coconut oil to be a liquid or soft enough to use straight from the cupboard, so if yours is too firm you’ll need to spoon out what you need and soften it in a small bowl in the microwave first.

    banana oat cookies top


    Recipe

    Yield: 8

    Total Time: 40 minutes

    Ingredients:

    • 1 medium banana

    • 1 cup / 100g rolled oats

    • 2 tbsp maple syrup or agave 

    • 1 tbsp coconut oil (melted)

    • Pinch of salt

    Method:

    1. Preheat your oven to 170c and line a baking tray with parchment.

    2. Mash your banana in a bowl with a fork, then mix in your syrup, oil and oats. Leave this mix to rest for 15 minutes to let the oats soak up some moisture.

    3. Gently fold in your chocolate chips and salt, then using 1 tbsp of mix, roll it into a ball in your hands and then gently flatten. 

    4. Place onto the baking tray and bake for 15 minutes

    5. Remove from the oven and sprinkle with a few more chocolate chips if you want the aesthetic effect, otherwise they’re fine just as they are!


    These cookies will store for 2-3 days in an airtight container, then they’ll start to change texture a little, but they’ll still be safe to eat!

    What did you think of this recipe? Did you do anything differently? We’d love to hear from you in the comments below. Don’t forget that you can share all your foodie makes with us using the hashtag #HBivore.

    Follow us on Facebook and like us on Instagram to keep up to date with our latest recipes, news and content. You can also use the form below to receive all our news straight to your inbox each week. 

    Written by Amy Northwood
    Her-Bivore
    My passion for food and conservation has led me to where I am now! My aim is to show people that veganism can be diverse, tasty and adapted to fit every lifestyle and budget!
    You can find me on Instagram
    Amy Northwood - Her-Bivore


  3. Cut Ginger Sponge

    Ginger Cake

    Jump to Recipe>>

    Ginger cake is one we used to make at work a lot, that version was not vegan, given that it was the most traditional british style restaurant going. You’ll be glad to hear that in the time I was working there, between 2018 and 2019 (then i left) I noticed a HUGE boom in the number of vegan customers we were getting in for lunches, functions, weddings and afternoon teas! This was of course where I was in my element, making sure every vegan customer had just as much delicious choice as anyone else. 

    One of the most rewarding things was when the customer would make an effort to come to the kitchen to personally thank me, or one time I even got a cute handwritten note on a napkin. Anyway, back to the ginger cake.

    Veganising this one was interesting, as ginger cake has some extra additions you don't find in many other sponges, such as the syrup, so I wasn’t too sure how a change of ingredient, and therefore consistency, might plact the final consistency and flavour! Luckily for us, it turned out amazing.

     A lot of traditional ginger cake recipes also use black treacle, but I didn’t have any in the cupboard and I tried this recipe whilst on lockdown due to coronavirus, so I simply didn’t use it! I also thought it would reduce the amount of ingredients, and it still gave a deliciously rich, syrupy ginger sponge anyway, so really it's less effort or a great result!

    This was part of my baking extravaganza which has somehow kept me sane in these crazy times of social distancing and lockdown, so I would really recommend baking a delicious 9 x 9 tray of sanity for yourself if you find yourself in a situation where you need some bake-therapy. 

    Another thing to note: when you pour the batter into the baking tray, don’t worry, it's supposed to be that runny! That’ll all firm up and sponge-up into delicious light ginger cake in the 35-40 minutes in the oven.

    Some people also like to top their ginger cake with drizzles of icing. I’ve never been a huge fan of this, and instead i like to just enjoy mine on its own, or warmed with some alpro custard (which I could eat [drink?] by the carton if I had the chance). If you wanted to add some icing on top, by all means go ahead! Make sure you let me know in the comments below, and tag us in your tasty Her-Bivore makes on instagram too!


    Whole ginger sponge

    Recipe

    Yield: 16

    Total Time: 60 minutes

    Ingredients:

    • ¾ cup / 200g vegan margarine

    • 1 cup / 200g soft dark brown sugar

    •  cup / 275g golden syrup

    • 3 cups / 360g self raising flour

    • 2 tbsp ground ginger

    • 2 tsp cinnamon

    • ¼ tsp salt

    • 1 cup /240ml dairy-free milk 

    Method:


    1. Preheat the oven to 180c and line a 9 x 9 inch baking tin.

    2. In a bowl with an electric mixer, whisk together your margarine and sugar, then add in your golden syrup.

    3. In a separate bowl, sieve your flour, ginger, salt and cinnamon.

    4. Adding 4-5 tablespoons at a time, gradually add your flour mix into your wet mix, whisking until just combined.

    5. Finally, using a spatula or spoon, mix in your non-dairy milk.

    6. Pour your cake batter into your prepared tin, and bake for around 40 minutes, unti a cocktail stick/skewer/knife/cake tester comes out clean!

    7. Once cooled slightly, transfer onto a cooling rack. 


    What did you think of this recipe? Did you do anything differently? We’d love to hear from you in the comments below. Don’t forget that you can share all your foodie makes with us using the hashtag #HBivore.


    Follow us on Facebook and like us on Instagram to keep up to date with our latest recipes, news and content. You can also use the form below to receive all our news straight to your inbox each week. 

  4. Jammy Dodgers

    Vegan Jamie Dodgers

    Jump to Recipe>>

    I was walking through the supermarket the other day, working my way through the isles I needed, skipping the biscuit aisle completely as to try to avoid those sugary temptations, when something caught my eye on the end of an isle. 

    The ‘specials’ section, with all the offers and discounted products dragged me in, and of course, staring back at me was a packet of jammie dodgers. All it took was that brief second for me to know that i just HAD to make some vegan jammie dodgers.

    Jammy Dodgers actually used to be accidentally vegan, until some point in 2016 where the clearly confused company decided to add whey (milk protein) to their recipe in a bid to improve dwindling sales.

    The theory is pretty basic, just a simple crumbly biscuit recipe with some rich jam sandwiched in the middle. You want to make sure you use a seedless jam otherwise your biscuits won’t sit right. Also make sure you give your jam a good stir so you don’t have any big lumps, you want a smooth sweet center to your delicious treats.

    Of course, you’ll need biscuit cutters. The traditional design uses a round cutter for the biscuit shape, and then a smaller, heart shaped cutter for the centre of half the biscuits, so when they sandwich together you get that irresistible cute little jammy heart. 

    If you haven't got those shapes, don’t worry too much! As long as you have one bigger cutter for the biscuit shape itself and then a smaller cutter for the inside, they’ll work perfectly fine. Remember though, the bigger biscuit size you choose, the less it’ll make in total and the longer they’ll need in the oven, and vice versa.

    These exciting little biscuits are great for having around the house as a daily treat (or 5-daily treat in my case) but also make a fabulous kid-friendly recipe to keep you and your little ones busy on a rainy day.

    If you’re truly a biscuit connoisseur, you may be wondering how this recipe creates decadent jammy dodgers when we all know the jam is much ticker in store bought jammie dodgers. Nothing gets past your keen biscuit senses, eh?

    If you’re desperately after that thick jammy texture, you’ll need to pop your jam into a pan first and gently reduce it down to the desired consistency.

    You also don’t have to use raspberry jam. The beauty of homemade is the somewhat limitless realms of customisation. You can use any type of seedless jam you have, or that you think would be delicious. There's also nothing stopping you making a batch where they each have different jams, a ‘homemade variety batch’ of jammy dodgers if you will.

    Be sure to tell us in the comments below which cutter shapes you used, bonus points for sharing a photo on instagram and tagging us! (we might even feature you on ours!)


    Recipe

    Yield: 12 biscuits 

    Total Time: 20 minutes

    Ingredients:

    • ½ cup / 120g vegan margarine

    • ½ cup / 110g caster sugar

    • 1 ½ cups / 180g plain flour

    • Seedless raspberry jam

    Method:

    1. In a mixing bowl or with a whisk, cream together your margarine and sugar until combined. 

    2. Slowly add your flour bit by bit until you’ve added it all and the mix comes together to form a ball. If your mix is still crumbly, just keep mixing and wait, it’ll come together in it’s own time.

    3. Remove the mix from the bowl and form into one ball, then place into the fridge for about 30 minutes (this helps the biscuits keep their shape as they bake).

    4. Preheat your oven to 180c and line a large tray with baking parchment.

    5. Roll out your mix on a lightly floured surface to about 1/2cm, thickness, then use your cutter to make as many biscuits as you can, re rolling and cutting as required until all your mix is used up. Use your smaller cutter to cut the smaller centre holes in half your biscuits.

    6. Bake for 10-15 minutes, but watch closely! You want the biscuits to be just starting to go golden brown around the edges. 

    7. Remove from the oven, and once cooled slightly, transfer to a collign rack until completely cold.

    8. Once cool, spoon about ½ teaspoon of jam into the centre of your whole biscuits, and then gently top with a centre shaped biscuit. 


    What did you think of this recipe? Did you do anything differently? We’d love to hear from you in the comments below. Don’t forget that you can share all your foodie makes with us using the hashtag #HBivore.


    Follow us on Facebook and like us on Instagram to keep up to date with our latest recipes, news and content. You can also use the form below to receive all our news straight to your inbox each week.

    Written by Amy Northwood
    Her-Bivore
    My passion for food and conservation has led me to where I am now! My aim is to show people that veganism can be diverse, tasty and adapted to fit every lifestyle and budget!
    You can find me on Instagram
    Amy Northwood - Her-Bivore

    Stay up to date with all our latest articles
    • This site is protected by reCAPTCHA and the Google Privacy Policy and Terms of Service apply.

  5.  

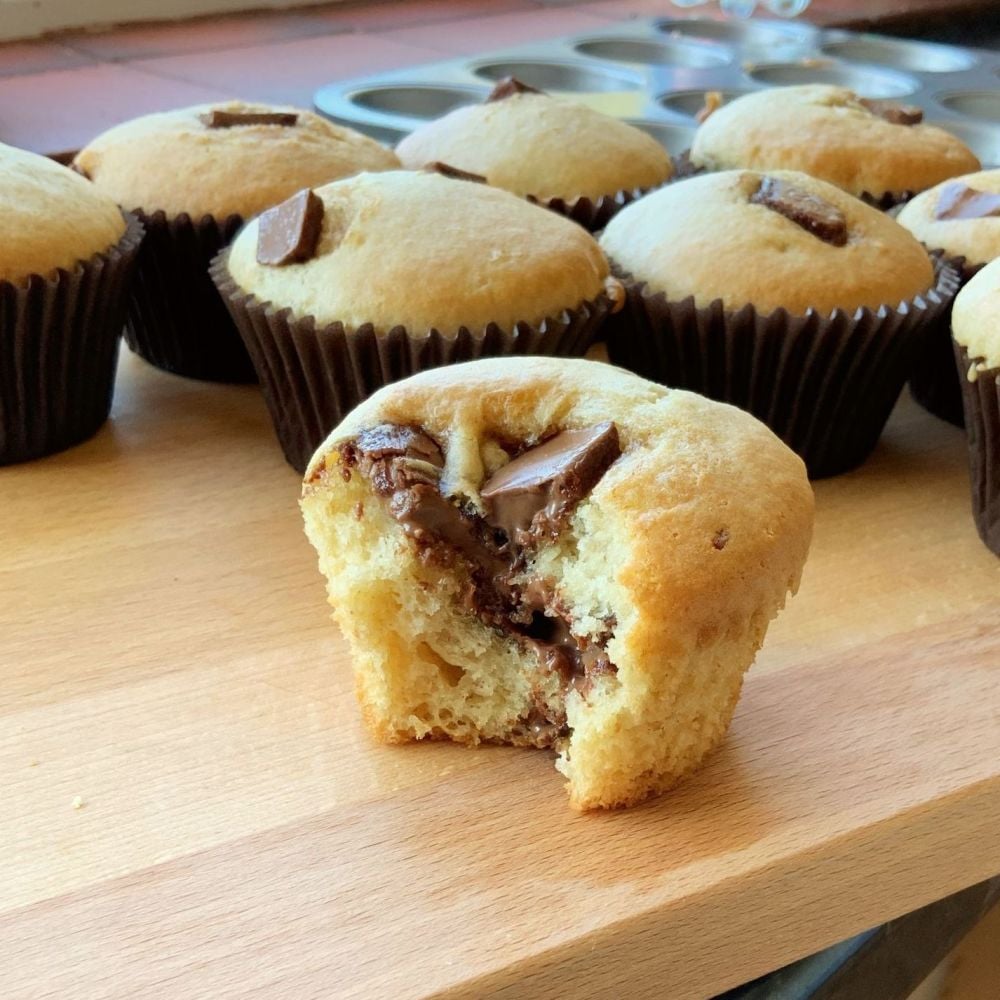
    Chocolate Chunk Muffins

    Chocolate Chunk Muffins

    Today will be a good day, and do you want to know why? Because you, my friend, are going to make the most deliciously fluffy vegan chocolate chunk muffins. It's time to let all your worries slip away into devine smells and flavours.

    I'm a huge fan of chocolate but I know many of your prefer a fruit muffin, which is why they don’t have to be chocolate if you’d prefer something else! This recipe works great with chocolate chips, blueberries or raspberries. If you try anything else make sure you let me know in the comments or by tagging us on instagram and using the #HBivore hashtag! 

    I always think the quality of the ingredients goes a long way to determining the flavour of the end result, and this is no different. I used the vegan galaxy orange chocolate broken into pieces as the chunks for my muffins as i had a bar leftover that my mum had got my for my birthday, but any delciious vegan chocolate will do!

    As a little tip, make sure you save some chunks to place on the top of the muffins just before they go into the oven!

    I like to think this recipe doesn’t contain any really unusual ingredients, even if it may seem like unusual muffin ingredients (such as applesauce) and as though we’re using them in seemingly unconventional ways (like curdling soy milk with lemon juice) if you’re familiar with vegan baking you’ll know that we find the most weird and wonderful ways of reaching a delicious result.


    Recipe

    Yield: 8-10 large muffins

    Total Time: 45 minutes

    Ingredients:

    • 1 cup / 250ml soy milk

    • 1 ½ tbsp lemon juice

    • 1 tbsp apple sauce

    • 1 cup caster sugar

    • â…“ cup sunflower oil

    • 1 3/4 cups / 210g plain flour

    • 2 tsp baking powder

    • ½ tsp bicarbonate of soda (baking soda) 

    • Pinch sea salt

    • 1 cup chocolate chunks (or your filling of choice)

    Method:

    1. Preheat oven to 180c and fill a 12 hole muffin tray with cases.

    2. In a small bowl, mix your soy milk and lemon juice, set to one side for five minutes to curdle.

    3. Add your sugar, oil and apple sauce.

    4. In another bowl mix together your flour, baking powder, salt and bicarbonate of soda. Add your wet mix to the dry and gently mix together until just combined.

    5. Fold in your chocolate chunks (saving some for topping) and then fill your muffin or cupcake cases to about 3/4 full.  Top with any leftover chocolate chunks and bake in the oven for 30 minutes or until a cocktail stick inserted into the middle comes out clean.


     What did you think of this recipe? Did you do anything differently? We’d love to hear from you in the comments below. Don’t forget that you can share all your foodie makes with us using the hashtag #HBivore.

    Follow us on Facebook and like us on Instagram to keep up to date with our latest recipes, news and content. You can also use the form below to receive all our news straight to your inbox each week. 

    Written by Amy Northwood
    Her-Bivore
    My passion for food and conservation has led me to where I am now! My aim is to show people that veganism can be diverse, tasty and adapted to fit every lifestyle and budget!
    You can find me on Instagram
    Amy Northwood - Her-Bivore

    Get Notified When We Launch...
    • This site is protected by reCAPTCHA and the Google Privacy Policy and Terms of Service apply.