Her-Bivore Blog

 RSS Feed

Category: Mains

  1. Kentucky Fried Jackfruit Drumsticks

    Posted on

    KFJ

    So with the turn of 2019, we’ve seen Greggs, McDonalds and various other popular food places produce some awesome options for vegans to try out.

    You know who hasn’t jumped on the bandwagon? KFC...

    Granted, Kentucky Fried Chicken doesn’t really stand out as a place that caters for vegans, but I don’t think some cauliflower coated in the secret herbs and spices is too much to ask for.

    Anyway, I’ve come up with a solution that takes cauliflower drumsticks a step further, and unlike the colonel, I’m not going to keep my herbs and spices a secret from you.

    Roll on KFJ – Kentucky Fried Jackfruit...


    Recipe

    Total Time: 1H 30M

    Yield: 6-8 Drumsticks

    Ingredients:

    • 2 x 400g tins jackfruit
    • 1 large cauliflower
    • 1 ½ cups veg stock
    • 1 + 1 tsp garlic powder
    • 2 tsp nutritional yeast
    • 2 tbsp bbq sauce (I used Jack Daniels)
    • ½ cup plain white flour
    • 1 tsp turmeric
    • 2 tsp celery salt
    • 2 tsp cracked black pepper
    • 2 tsp paprika
    • 2 tsp peri peri flavouring
    • 2 tsp rock salt
    • Aquafaba from 1 x 400g tin chick peas
    • Pinch dried oregano

    Method:

    1. Drain your jackfruit and then rinse it thoroughly, you want to ensure you’ve removed all the brine.

    2. Remove any hard core sections or seeds from the jackfruit, so you’re only left with the fleshy pieces.

    3. Place your veg stock into a pan with your nutritional yeast, bbq sauce and 1 tsp of garlic powder.

    4. Mix together and place on a high heat to bring to the boil, then add your jackfruit and boil on a medium heat for 10 minutes.

    5. Cover your pan with a lid and then reduce to a low heat and allow to simmer until all the liquid is absorbed.

    6. While you wait, separate the stalk from the cauliflower by cutting off the florets. You then want to cut the stalk into 6-8 drumstick pieces, these will be the ‘bones’.

    7. Divide the jackfruit into even amounts, depending on how many stems of cauliflower you made, and then lay out a small piece of cling film and place your jackfruit portion on top. Press the cauliflower stalk into the jackfruit mixture and then use the clingfilm to mold the mixture into a traditional drumstick shape. You only want about a ¼ of your cauliflower drumstick showing.

    8. Repeat for all your drumsticks, and then place in the freezer for about an hour to firm.

    9. In a bowl, mix together your flour, turmeric, celery salt, black pepper, peri peri flavouring, paprika, rock salt and oregano. In a separate bowl you just need your aquafaba.

    10. Once your drumsticks have been in the freezer for an hour, place a pan of oil on the stove on a high heat, you’ll need it deep enough to cover the drumsticks.

    11. Once you remove the drumsticks from the freezer, you’ll need to work fairly quickly to stop them defrosting and losing their shape. Unwrap them one by one and dip into the aquafaba, and then roll them in the flour mix. You’ll want to place each drumstick in the flour mix twice to ensure a nice thick coating.

    12. Check your oil is hot enough by placing a small piece of bread into the pan, it should bubble and start to fry immediately. Place your drumsticks directly into your hot oil and cook for about 4-5 minutes or until golden brown.

    13. Once cooked, remove from the oil and place onto a tray lined with kitchen towel (this will absorb any excess oil).

    I hope you liked our recipe. We served ours with some fresh lettuce, mushrooms and deep-fried onion rings. What do you plan to serve yours with?

    You don’t necessarily have to use my blend of herbs and spices either. If there’s a combination you are going to try out, we’d love to hear about that too! Let us know in the comments below.

    Don’t forget to join the discussion. Share your foodie makes with us in instagram using #HBivore

    Follow us on Facebook to keep up to date with our latest recipes, news and content!

    Written by Jack Ricketts
    -Him-Bivore
    Marketing has always been my career focus. I am striving to promote a plant-based lifestyle to the masses through positive campaigns and sharing the benefits of veganism. The animals, and the planet, need us more than ever to make a change. 
    You can find me on Instagram

  2. Vegan Tofu Thai Green Curry Recipe

    Posted on

    Thai Green Curry

    <<Back to Mains

    If you follow my recipes, you may already have figured out that I have a penchant for zesty, Eastern flavours. It’s on my to do list to perhaps try and make a more earthy flavoured curry at some point. However, A Thai Green Curry recipe was naturally the next step and I’m pretty damn proud of it.

    The main difficulty when converting this recipe was that, traditionally, Thai Green Curry is made with a fish or shrimp paste. So how does a vegan get that sea flavour in a recipe? I substituted the paste for a tablespoon of dried seaweed which added some awesome flavour and some bonus nutrition.

    As it’s cooking, you may think it’s looking a bit busy in the wok. There are a lot of ingredients that go into this dish. The pay off is a highly nutritional and flavour-packed curry that I really hope you’ll enjoy.


    Recipe

    Total Time: 30 minutes

    Yield: 4 portions

    Ingredients:

    • 4 medium onions

    • 3 cloves of garlic

    • 2 birds eye chillis

    • 1 lime

    • 1cm2 piece of ginger

    • 1 tablespoon of dried seaweed

    • 3 tablespoons of lemon juice

    • 1 400ml tin of coconut milk

    • 1 lemongrass stalk

    • 2 handfuls of pak choi

    • 1 small bag of green beans

    • 1 tablespoon of cumin seeds

    • 4 shredded kaffir lime leaves

    • 1 block of firm tofu

    Method

    • Roughly chop your onions, garlic, chillies and ginger and chuck it in a blender. You can adjust the amount of chillies based on your preference but we found it wasn’t too hot. Add to that the zest of your lime, your lemon juice and the dried seaweed and blitz until it forms a paste.

    • Drain your tofu and dice it up into medium sized chunks. Using a clean, dry, tea towel, press down on them gently to remove as much moisture as possible, this will allow them to absorb the flavouring better. Place them into a bowl with 1 tbsp oil and some salt, pepper and a teaspoon of cumin and mix until evenly coated.

    • Place your tofu into a large wok and fry until crispy, but not burnt. When your tofu looks like it’s golden, crispy and delicious, add in your tin of coconut milk and reduce to medium heat. Give it a good stir and wait for the coconut milk to simmer.

    • When it’s simmering, add your blended mix of the garlic, chillies etc and give that a good stir too. Bring it to a simmer again and allow to reduce down slightly.

    • Add in your green beans and pak choi and leave it to simmer for around 10 minutes.

    • Finally add in your lemongrass by pulling pieces apart, kaffir lime leaves and cumin seeds and stir it through for another 5 minutes.

    • Serve with some freshly cooked rice and garnish with coriander.


    How did it go? Let us know! Share your foodie makes with us in instagram with #HBivore. 

    Follow us on Facebook and like us on Instagram to keep up to date with our latest recipes, news and content!

    Written by Jack Ricketts
    -Him-Bivore
    Marketing has always been my career focus. I am striving to promote a plant-based lifestyle to the masses through positive campaigns and sharing the benefits of veganism. The animals, and the planet, need us more than ever to make a change. 
    You can find me on Instagram

    <<Back to Mains 

  3. Curried Parsnip and Spinach Soup

    Posted on

    Curried parsnip and spinach soup

    Curried Parsnip and Spinach Soup

    With the frosty mornings and evenings spent hiding under blankets, cuddled up to pets for warmth, there’s no better time to make a batch of soup. The warming mild curry sensations with freshly baked bread is sure to keep the whole family cosy this winter. With only five ingredients (and a pinch of cracked black pepper), making delicious, wholesome and cruelty-free food has never been so easy!

    I used a medium curry powder, which gave for a nice mild soup, but if you’re after something with a bit more of a hit, you can up the heat with a hotter powder and a larger quantity, remember to keep trying as you add though, as you can’t take it back when you’ve added it.


    Recipe

    Yield: 4 portions

    Total Time: 40 minutes

    Ingredients:

    • 600g Peeled parsnips
    • 2 Cubes veg stock
    • 1 Large white onion, diced
    • 2 Tbsp medium curry powder
    • 150g Fresh spinach

    Method:

    • Dice up your parsnips, discarding the ends. The smaller you chop them the faster your soup will cook, I normally go for a medium dice, but if you’re in a rush you can go smaller.
    • Add them to a pan, along with your diced onion, veg stock and curry powder. Cover with water and place on a high heat.
    • Once boiling, turn down to a simmer and leave to cook until your parsnip is nice and soft.
    • Add your spinach and cook for a couple of minutes until the spinach is wilted.
    • Blend until smooth in a blender or food processor, if the soup is very thick you may want to add some boiling water, then season with black pepper and serve with your favourite crusty bread.


    Don’t worry if you have some left, the soup will stay good in the fridge for up to 3 days, but is also great for freezing! Simply gently reheat in a pan on a low heat.

    How did it go? Let us know! Share your foodie makes with us in instagram with #HBivore. 

    Follow us on Facebook and like us on Instagram to keep up to date with our latest recipes, news and content!

    Written by Amy Northwood
    Her-Bivore
    My passion for food and conservation has led me to where I am now! My aim is to show people that veganism can be diverse, tasty and adapted to fit every lifestyle and budget!
    You can find me on Instagram

    Amy Northwood - Her-Bivore

  4. Meat-Free Cottage Pie Topped With Parsnip and Spinach Mash

    Posted on

    Cottage Pie Topped With Spinach and parnip mash

    Meat-Free Cottage Pie Topped with Parsnip and Spinach Mash

    When I first thought about making this, I really thought I was going out on a limb. It’s not that I didn’t expect it to work, I just wasn’t expecting it to be one of the best dishes I think I’ve ever created.

    One of the biggest problems I find with vegan mince is that it is generally flavourless, and a lot of people use it expecting it to contain the same flavours you’d find in beef mince. When using meat-free mince you have to add the flavour yourself, which is one of the things I love most about it! This makes it so versatile, you can add whatever flavours you’d like, and in this recipe, I’ve really nailed it.

    Packed full of protein, vitamins and anti-oxidants, this cottage pie will satisfy everyone’s taste buds, vegan or not.


    Recipe

    Total Time: 1H 30M

    Yield: 6 Portions

    Ingredients

    • 300g Vegan mince
    • 1Tbsp soy sauce
    • 1Tbsp oil
    • 2 Cloves garlic
    • 150g Spinach
    • 2 Tbsp balsamic vinegar
    • 1 Large white onion
    • 3 Medium carrots
    • 400ml Thick vegan gravy (I used Bisto Original gravy granules for mine)
    • 2 Large potatoes
    • 3 Parsnips
    • 1 Tbsp vegan margarine
    • Salt and pepper to taste

    Method

    1. Peel your parsnips and potatoes for your mash and place into a pan, cover with water and place on a high heat to bring to the boil.

    2. In the meantime, finely dice your onion and garlic and fry off in a pan on a high ehat with 1tbsp of oil.

    3. Peel and finely dice your carrots, then add to the pan and turn down to a medium heat. Fry off for about 3 minutes.

    4. Add your vegan mince and leave to cook, stirring occasionally, until the mince is browned, and the carrots are cooked.

    5. Add your gravy and mix well, then transfer into your desired oven proof dish. Set to one side while you prepare the topping.

    6. Once your potatoes and parsnips are nice and soft, drain them. Then using the same pan, add your spinach and your tbsp of vegan margarine and in a medium heat cook your spinach for about a minute until wilted.

    7. Using a blender, blend your spinach mix until smooth.

    8. Mash your potato and parsnips, then mix in your spinach mix and season to taste. Transfer into your cottage pie dish, then use a fork to even out and create a nice texture on the top.

    9. Place into the oven and bake for around 30 minutes or until the top begins to brown.

    10. Remove from the oven and allow to sit for 5 minutes before serving.


    How did it go? Let us know! Share your foodie makes with us in instagram with #HBivore. 

    Follow us on Facebook to keep up to date with our latest recipes, news and content!

    Written by Amy Northwood
    Her-Bivore
    My passion for food and conservation has led me to where I am now! My aim is to show people that veganism can be diverse, tasty and adapted to fit every lifestyle and budget!
    You can find me on Instagram

    Amy Northwood - Her-Bivore

  5. Carrot and Sage Soup

    Posted on

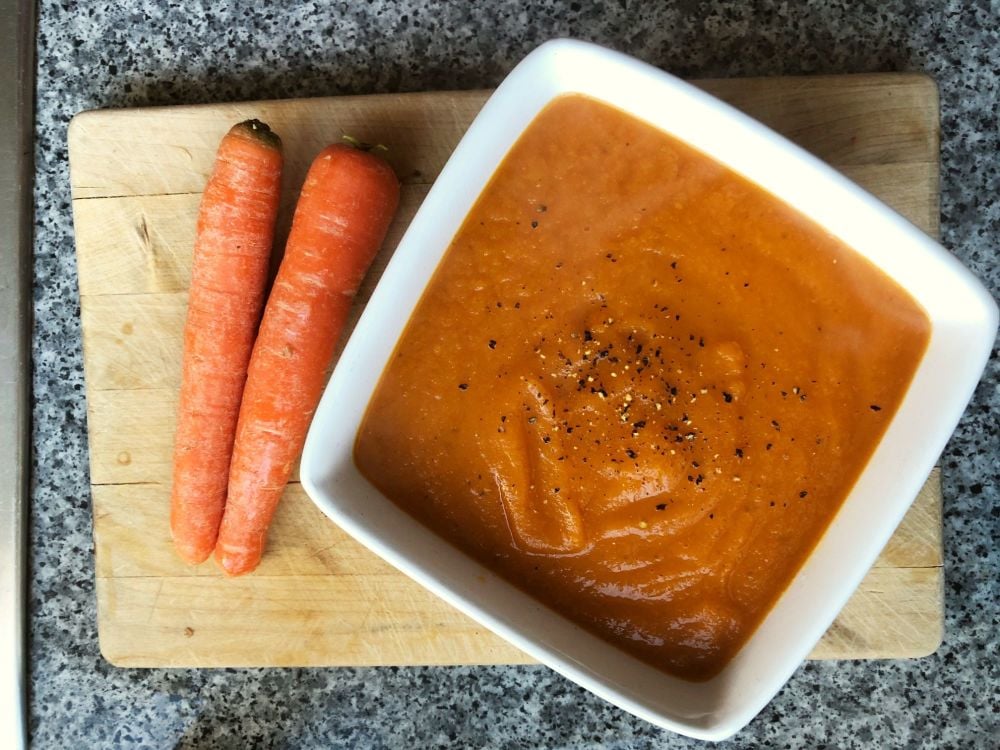
    Carrot Soup

    Carrot and Sage Soup

    This is a real winter warmer that I first came up with just after Christmas.

    I’d picked up a lot of leftover cheap veg from Asda and needed to come up with some easy ways to use it up, so using my brand-new blender (thanks, Mum!) soup seemed like a pretty good option.

    This is a great meal prep to be done in advance as it can be frozen in portion/family sized tubs and then just put into a pan frozen and gently reheated, which makes it a great option for me as a student who often needs quick and easy nutritious meal options to keep me away from the ordering apps...


    Recipe

    Total Time: 45 minutes

    Yield: 4 Portions

    Ingredients

    • Two medium potatoes
    • One large white onion
    • 2 Sprigs of fresh sage
    • 600g Carrots
    • 2 Vegetable stock cubes
    • Salt and pepper to taste
    • 2 Cloves garlic

    Method:

    1. Peel your potatoes, onion and carrots and chop them into small-ish chunks, about 5cm x 5cm is fine.

    2. Peel your garlic, and finely chop it along with your fresh sage.

    3. Add all your ingredients to a large pan and cover with water, then add your stock cubes and place on a high heat to bring to the boil.

    4. Leave to simmer until all the vegetables are nice and soft, you may need to top up with water throughout, but you want it so that the veggies are just covered.

    5. Place into a food processor or blender and blend until smooth, if your soup is really thick, add some boiling water until you reach you're desire consistancy.

    6. Season to taste, then serve! If you’re freezing some, simply tub up, leave on the side to cool down to room temperature, then lid and freeze. The fresh soup will last up to three days in the fridge.


    How did it go? Let us know! Share your foodie makes with us in instagram with #HBivore. 

    Follow us on Facebook and like us on Instagram to keep up to date with our latest recipes, news and content!

    Written by Amy Northwood
    Her-Bivore
    My passion for food and conservation has led me to where I am now! My aim is to show people that veganism can be diverse, tasty and adapted to fit every lifestyle and budget!
    You can find me on Instagram

    Amy Northwood - Her-Bivore