Her-Bivore Blog

 RSS Feed

Category: Desserts

  1. Vanilla Sponge Cake

    Posted on

    side view vanilla strawberry sponge

    Vanilla Sponge Cake

    A vanilla sponge cake is the ultimate option for 'tea and cake'. I'm normally a huge fan of chocolate, but I recently found myself really craving vanilla cake. I put it down to the fact that i didn't have a recipe at hand and that my body was subconsciously trying to force me to write a new one!

     This one turned out absolutely perfect, and I just know you'll all love it as much as i did. I used this recipe recently to make my mum’s birthday cake, and I simply topped it with LOADS of fresh strawberries and it went down a treat with everyone. 

    The best part about this cake is how you can really decorate it to suit any occasion, once you’ve got the basic sponge recipe down, you can fill, ice and decorate as you please. I used seedless strawberry jam for the middle, but that's only because it’s my favourite, you really can use any jam you like, or even none at all!

    Some vegan cake recipes use flax or chia seeds to replace the eggs, but I found in this style of cake it made it quite grainy in texture, plus I wasn't a big fan of having little back dots throughout my cake. Instead, the plant milk curdles with the lemon juice, and this works to replace the eggs you should find in a traditional non vegan cake recipe.

    When it comes to baking vegan butter icing, you have to be so careful not to make it too runny. I always place my cake in the fridge after decorating, as I find vegan icing has a tendency to be softer than other icing, making it susceptible to running a little! 

    The way I test my icing is thick enough is by gently dabbing it in the bowl with one finger, if you have any icing actually stick to your finger, you probably want it a little thicker.

    Let me know how you got on in the comments below, and as always make sure you tag us in all your foodie makes on instagram!

     Top view vanilla strawberry sponge


    Recipe

    Yield: one double layer 8 inch cake (two 8 inch sponges)

    Total Time: 2 Hours

    Ingredients:

    • 1 1/2 tbsp lemon juice (fresh or bottled is fine)

    • 2 1/4 cups / 540ml plant milk (soy or oat works great)

    • 3 cups / 420g plain  flour

    • 1 1/2 cups / 340g granulated sugar

    • 1 tbsp baking powder

    • 1 tsp  bicarbonate of soda

    • 1 1/2 tsp salt

    • 3/4 cup / 175ml oil

    • 3 tsp vanilla extract

    To Decorate:

    • Jam

    • 3 ¾ cups / 435g icing sugar

    • 3 tbsp vegan margarine

    • 3 tbsp plant milk

    • 2 tsp vanilla extract

    Method:

    1. Preheat the oven to 175c and line the base of two round 8 inch baking tins with parchment.

    2. In a second mixing bowl whisk together the flour, sugar, baking powder, bicarbonate of soda, and salt until fluffy.

    3. Add your oil and vanilla extract into your milk mix and mix to combine, then pour your wet ingredients into your dry and whisk until smooth.

    4. Split your mix between your two cake tins, and then bake in the middle of the oven for about 35-40 minutes, test your cakes by inserting a cocktail stick or skewer into the centre of each one, if it comes out clean they’re ready!

    5. Leave to cook for a few minutes before transferring to a wire cooling rack and allowing to cool completely.

    6. To make your icing, beat together all your icing sugar, vegan margarine and vanilla extract.

    7. Then add in your plant milk, one tbsp at a time. If you don’t need it all, don’t add it all, but if you need a little more, that's fine too! You want your icing nice and thick. Make sure you beat your icing on a high setting of your electric mixer for a good few minutes, this will stop it feeling grainy.

    8. Take your sponge cakes, and decide which you want to be the bottom, then spread a fine layer of jam over it (you want your cakes to be ‘bottom to bottom’ when you cake is assembled).

    9. Then either using a spectacular or a piping bag, pipe or spread a layer of icing sugar on top of the jam. Carefully place your second cake on the top, and then either leave it as it is, or you can spread butter icing on the top too! 

    10.  Decorate as you wish, and then place in the fridge for your icing to set.


    What did you think of this recipe? Did you do anything differently? We’d love to hear from you in the comments below. Don’t forget that you can share all your foodie makes with us using the hashtag #HBivore.


    Follow us on Facebook and like us on Instagram to keep up to date with our latest recipes, news and content. You can also use the form below to receive all our news straight to your inbox each week. 


    Written by Amy Northwood
    Her-Bivore
    My passion for food and conservation has led me to where I am now! My aim is to show people that veganism can be diverse, tasty and adapted to fit every lifestyle and budget!
    You can find me on Instagram

    Amy Northwood - Her-Bivore

  2. Crumble Coffee Cake

    Posted on

    Vegan Coffee Cake

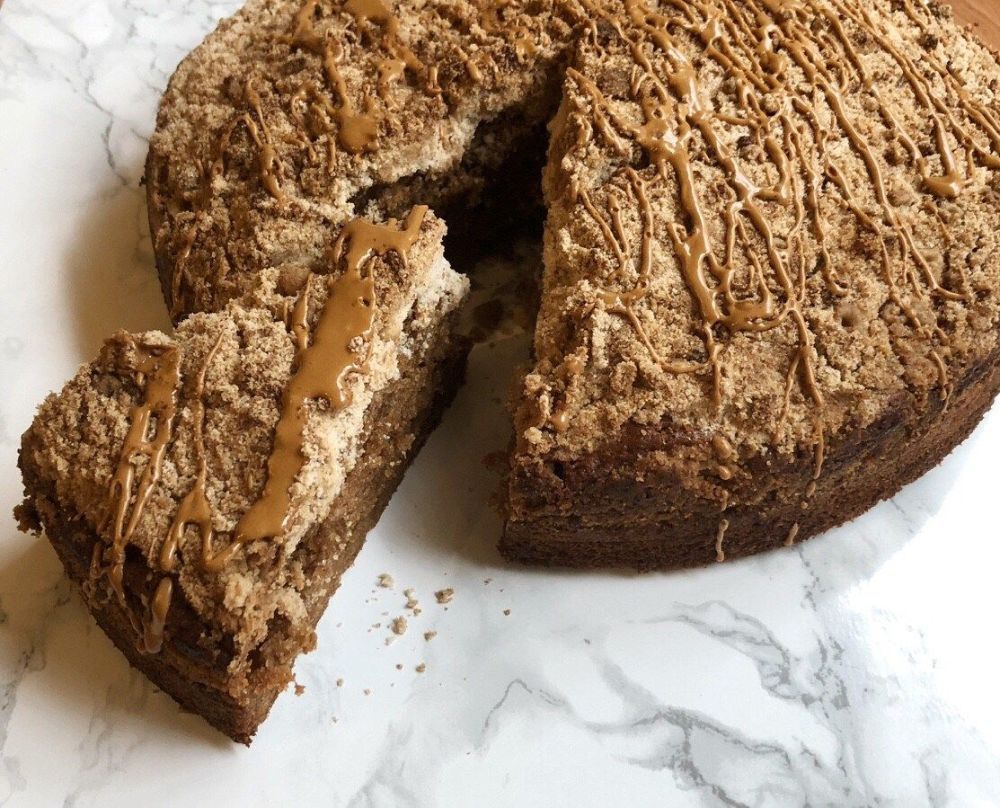
    Crumble Coffee Cake

    I was at a bit of a loss as to what to call this cake. It’s definitely a coffee cake, but I was on the fence as to how to describe the style of cake. What makes this cake unique is that you leave some of the dry ingredients out and then you sprinkle them over the top just before cooking. This gives you a delicious crumbly biscuit like topping to the cake.

    The sponge itself is so perfectly moist, partly due to the crumbly top keeping all that moisture in! While this isn’t the most traditional coffee cake recipe out there, it makes a great change and is a firm favourite for having with a nice hot cuppa.

    When it comes to using coconut yoghurt, any you’ve got around will do. I love the flavour the coconut yoghurt brings to the mix, but any vegan yoghurt will do the trick!

    If you’re feeling a bit of something different next time, or if you’re going off on a baking extravaganza, here's some more delicious cake ideas:


    Happy Baking!


    Recipe

    Yield: 9 inch round cake

    Total Time: 30 minutes 

    Ingredients:

    For the sponge

    • 300g / 2 cups plain flour

    • 75g / 0.5 cups self raising flour

    • 2tsp cinnamon

    • 1tsp baking soda (bicarbonate of soda)

    • 1tsp baking powder

    • 1/2 teaspoon salt

    • 200g / 1 cup light brown sugar

    • 110g / 0.5 cup granulated sugar

    • 150g / 0.75 cups coconut oil (vegan margarine would also work)

    • 250ml / 1 cup almond milk (soy milk would also work)

    • 2tsp vanilla extract

    • 100ml / 0.5 cup strong coffee i used around 4 heaped teaspoons of coffee

    • 90g / 1/3 cup coconut yogurt (Alpro soya yogurt also works)

    For the Icing

    • Icing sugar

    • 20ml strong coffee

    Method:

    1. Preheat your oven to 175c and line a 9×9 round inch cake tin.

    2. In a large bowl, place your flours, sugars, coconut oil (which will be solid if you’re in a colder climate) baking soda, baking powder and cinnamon. Combine them using your hands, you want to break the coconut oil into small pieces, but you don’t want to melt it with your body heat, your mix shouldn’t be completely smooth.

    3. At this point you want to remove 1 and 1/4 cups of your dry mixture and put it to one side for use later on. (This is about 150g)

    4. In a separate bowl, whisk together your coffee, almond milk, yogurt and vanilla extract until combined.

    5. Add your wet mix into your bowl of dry ingredients (don’t use the 150g you’ve separated) and gently fold until combined, be careful not to over mix. Your mix won’t be completely smooth due to your coconut oil.

    6. Pour into your cake tin, and then take the dry ingredients you separated earlier and sprinkle them evenly all over the top of the cake and then bake for 55-60 minutes or until a cocktail stick inserted into the middle comes out clean.

    7. Leave to cool for 10 minutes and then take out the tin and place on a cooling rack until completely cool.

    8. Take the coffee you prepared for your icing and add a small amount of icing sugar and mix until completely combined. keep adding more icing sugar until the desired thickness is reached, you want it nice and thick but runny enough to ‘flick’ over the cake using a teaspoon. You can put on as much or as little as you like.

    9. Leave to set, then your cake is ready to cut and serve!


    What did you think of this recipe? Did you do anything differently? We’d love to hear from you in the comments below. Don’t forget that you can share all your foodie makes with us using the hashtag #HBivore.


    Follow us on Facebook and like us on Instagram to keep up to date with our latest recipes, news and content. You can also use the form below to receive all our news straight to your inbox each week. 

    Written by Amy Northwood
    Her-Bivore
    My passion for food and conservation has led me to where I am now! My aim is to show people that veganism can be diverse, tasty and adapted to fit every lifestyle and budget!
    You can find me on Instagram
    Amy Northwood - Her-Bivore


  3. Lemon Cake

    Posted on

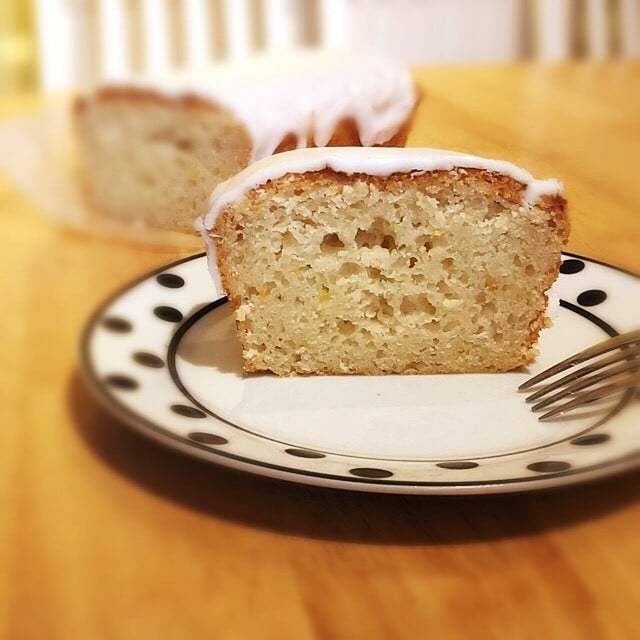
    Lemon Cake

    Lemon Cake

    Jump to Recipe>>

    You need just six ingredients to create this delicious lemon cake (excluding water, that comes out the tap). This British classic is one of the nations all time favourites, and yet is often overshadowed by the likes of chocolate cake or a classic victoria sponge. 

    Fear not, though, for we have come to bring this deliciously fresh ‘tea and cake’ essential back to your cake tin. A moist, citrusy, vegan alternative to the traditional recipe style, where no sacrifices are made (be that in animal products or taste).

    I’ve done this as an iced lemon cake, but if you would prefer a lemon drizzle, simply follow the recipe, but when the cake is taken out the oven, use a skewer or fork to poke holes over the top of the cake, and then drizzle with the juice of a lemon mixed with 85g of caster sugar. It will soak into the sponge and also leave a crisp, sweet topping too!

    If you’d rather make lemon cupcakes, that’s fine too! Simply split your cake mix into cases, filling them ½ to â…” full, and then watch carefully as they bake as they won’t need quite as much time as a larger cake. Be careful not to open the oven too early though as this may cause them to sink, instead, wait until they look like they’re lightly golden brown and then open the oven to test with a cocktail stick (insert a cocktail stick directly into the centre of one of the cupcakes, if it comes out clean, they're ready!).

    So to all your lemon-cake lovers out there… ready, set, BAKE!


    Ingredients:

    • 100ml  (0.5 cup) vegetable oil
    • 275g (2.75 cups) self raising flour
    • 200g (1 cup) caster sugar
    • 1 tsp baking powder
    • 170ml (3/4 cup) cold water
    • 1 lemon
    • 150g (1 cup) icing sugar

    Method:

    1.) Preheat your oven to 180c and line a 1lb loaf tin with baking parchment. Mix your flour, sugar, zest of your lemon and baking powder together in a bowl

    2.) In a jug mix together your oil, water and the juice of half your lemon.

    3.) Pour the contents of your jug into your dry ingredients and combine until smooth. Pour into your tin and bake for 30-40 minutes, or until a cocktail stick inserted into the middle comes out clean.

    4.) Allow to cool completely on a cooling rack.

    5.) In a bowl, combine your icing sugar with the remaining lemon juice. You want the icing to be thick enough to not run off your cake, you may need to add more icing sugar in order to reach the desired consistency.

    6.) Pour over your cake and allow to set. Cut and serve!


    What did you think of this recipe? Did you do anything differently? We’d love to hear from you in the comments below. Don’t forget that you can share all your foodie makes with us using the hashtag #HBivore.


    Follow us on Facebook and like us on Instagram to keep up to date with our latest recipes, news and content. You can also use the form below to receive all our news straight to your inbox each week. 


    Written by Amy Northwood
    Her-Bivore
    My passion for food and conservation has led me to where I am now! My aim is to show people that veganism can be diverse, tasty and adapted to fit every lifestyle and budget!
    You can find me on Instagram
    Amy Northwood - Her-Bivore


  4. Oreo Chocolate Tiffin

    Posted on

    Vegan Oreo Rocky Road Recipe

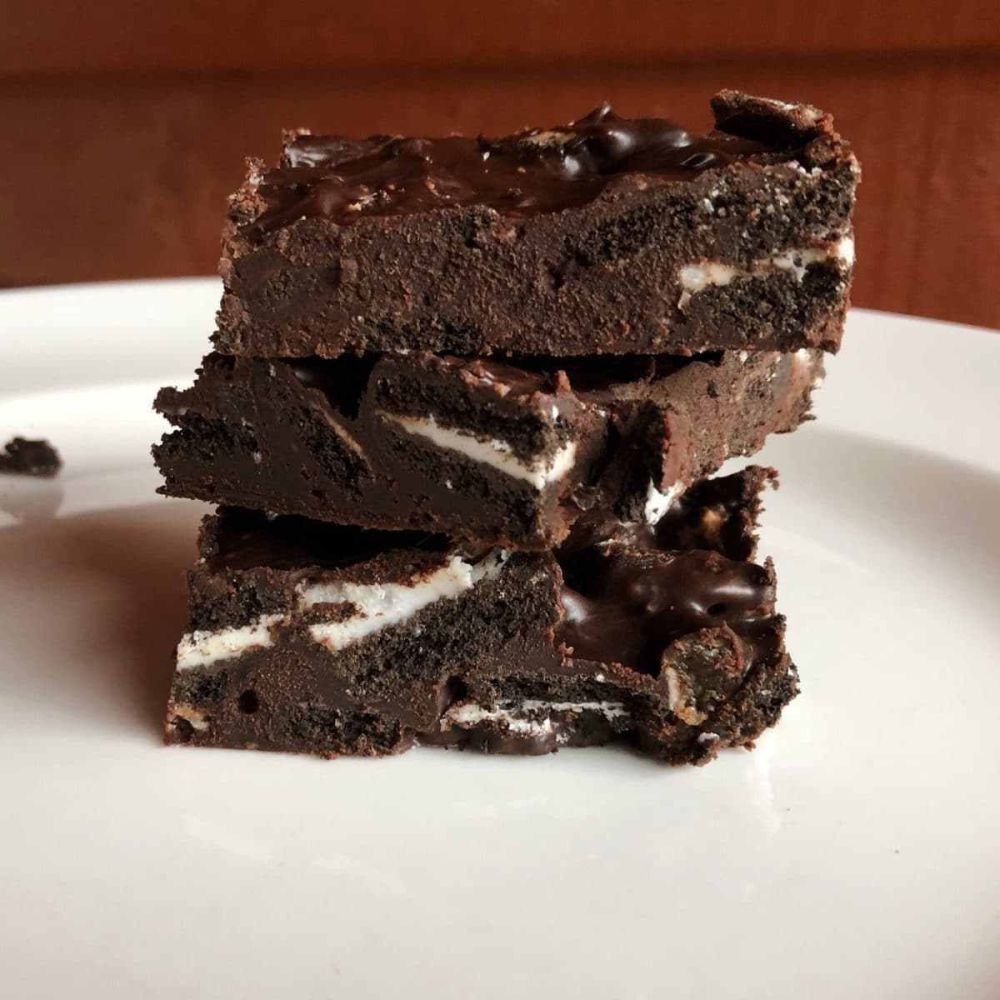
    Oreo Chocolate Tiffin

    Oreos have gained themselves a bit of controversy in the vegan world. While they ARE vegan by all ingredient accounts, the company who owns them haven’t stated that they are suitable for vegans as there is a cross contamination risk with milk products, as the factory in which they are made also makes products which do contain milk.

    While the company has stated this makes them unsuitable for vegans, by definition they are a safe for vegan biscuit, but not suitable for those with a severe dairy allergy. Controversy aside, let's get back to the delicious tiffin!

    Someone asked me the other day what the difference is between a rocky road and a tiffin, and why I was choosing to base my recipe off the idea of tiffin. I couldn’t answer them, and after some crucial research, there isn’t really a difference! It’s generally widely accepted that the addition of marshmallows is what changes a tiffin into a rocky road, so if you add marshmallows to yours then you can call it rocky road instead!

    You can put in whatever you like to this recipe. You can add nuts, vegan marshmallows or any type of dried fruits depending on your taste, just take out a few Oreos if you’re adding a lot of other ingredients so you still get a delicious chocolatey coating on everything.

    To make a gluten-free version, you can just replace the Oreos with gluten free digestives (usually found on the ‘free from’ section of any large supermarket).

    This recipe would also work with any other vegan biscuit, I want to try it with bourbons, digestives or biscoff!

    You’ll notice this is a no-bake dessert too, which is something I love about it. It’s perfect for days when you just don't want to have to put the oven on to make something delicious and it’s also great for making with kids and they really can help at every step of the way (especially eating it).


    Recipe

    Yield: 12 portions

    Total Time: 30 minutes

    Ingredients:

    • 200g (1.3 cups) vegan dark chocolate

    • 3 tbsp golden syrup

    • 120g (1/2 cup) vegan margarine

    • 170g (15 Oreos) Oreos

    • 75g (1/2 cup) Raisins 

    Method:

    1. Gently heat your chocolate and margarine in a bowl over a pan of hot water, ensuring it doesn’t get too hot and that your bowl isn’t touching the water.

    2. Break your Oreos into small pieces. (If you’re using vegan marshmallows, nuts or any larger dried fruits you’ll want to cut them up too.)

    3. In a bowl, mix your chocolate mix and your dry ingredients together until combined. Then press down into a 9×9 inch tray lined with baking parchment.

    4. Allow to cool completely, cut with a hot knife and enjoy! Store in an airtight container in the fridge.


    What did you think of this recipe? Did you do anything differently? We’d love to hear from you in the comments below. Don’t forget that you can share all your foodie makes with us using the hashtag #HBivore.


    Follow us on Facebook and like us on Instagram to keep up to date with our latest recipes, news and content. You can also use the form below to receive all our news straight to your inbox each week. 

    Written by Amy Northwood
    Her-Bivore
    My passion for food and conservation has led me to where I am now! My aim is to show people that veganism can be diverse, tasty and adapted to fit every lifestyle and budget!
    You can find me on Instagram
    Amy Northwood - Her-Bivore

  5. How To Make Box Cake Mix Into Vegan Cupcakes

    Posted on

    558990061249

    Box Cake Mix Cupcakes

    If you're looking for a cupcake recipe to test your skills then this is not for you! This vegan chocolate cupcake recipe is the almost ‘too good to be true’ cheats way to get perfect vegan cupcakes every time, especially considering there are only two ingredients you need to worry about, and they're both already measured out for you!

    They're lovely and moist and are perfect for parties or maybe even a naughty treat for yourself! It is worth mentioning that if you'd prefer one big cake then the method is just the same. You just have to make sure to adjust your cooking times accordingly, I find that they take longer to cook because the mix is slightly wetter than if you’d made them according to the box.

    If chocolate isn’t your thing (or if you fancy a change) this works with pretty much all the Betty Crocker mixes! The only box cake that isn't vegan from that range is the red velvet, due to the sourcing of the colouring.

    I’ve heard that there are some cheaper brand of box cake that work just the same, but I’ve never tried them so please let us all know in the comments if you’ve tried any other and whether they work!

    For this recipe you literally just need the box cake and a can of any carbonated beverage. I’ve made them with soda water, lemonade, cola, diet cola, honestly as long as it bubbles it should work.

    How does 330ml of carbonated drink replace the other ingredients? Why did someone ever try this in the first place? Your guess is as good as mine, but I’m glad it does and I’m glad they did.

    The good news is that the betty crocker icing range is almost pretty much all vegan too, and if you’re new to veganism the cadburys chocolate icing (and fudge icing!) are accidentally vegan too! If you want this type of icing to set though, you’ll have to pop them in the fridge when they’re iced.

    Recipe

    Total Time: >30 minutes

    Yield: 10 cupcakes

    Ingredients for the cupcakes:

    1 Box of Betty Crocker's Devils Food Cake Mix

    1 330ml Can of Carbonated Drink (I used diet cola)

    Ingredients for the icing:

    1 Tub of Betty Crocker's Chocolate Fudge Icing

    Method:

    1.) Preheat your oven to 180c. Empty the contents of the cake mix into a large mixing bowl and then add the can of coke. You should then whisk this mixture until it has combined, don’t worry about the bubbles, they’ll go.

    2.) Spoon your mix into your prepared cupcake cases. You want each one just over half full because this will give it space to rise. You won't get as many as the packet says, as you're not adding as much quantity to it as instructed but I usually get about 10 cupcakes.

    3.)Then bake for around 15-20 minutes, or until a rounded knife or cocktail stick inserted fully into the centre of a cupcake comes out clean and then cool on a wire cooling rack. 

    4.) Allow your cupcakes to cool completely. Using a piping bag with a nozzle, pipe the icing onto the cupcakes (if you haven't got a bag or nozzle handy, you can just use the back of a spoon to spread the icing onto the cakes). You can then either top with any vegan decorations, or just leave them plain! Then allow the icing to set completely and then store in an airtight container in the fridge.

    How Did You Get On?

    What did you think of this recipe? Did you do anything differently? We’d love to hear from you in the comments below. Don’t forget that you can share all your foodie makes with us using the hashtag #HBivore.

    Follow us on Facebook and like us on Instagram to keep up to date with our latest recipes, news and content. You can also use the form below to receive all our news straight to your inbox each week. 


    Written by Amy Northwood
    Her-Bivore
    My passion for food and conservation has led me to where I am now! My aim is to show people that veganism can be diverse, tasty and adapted to fit every lifestyle and budget!
    You can find me on Instagram

    Amy Northwood - Her-Bivore