Her-Bivore Blog

 RSS Feed

Category: Desserts

  1. Vegan Chocolate Brownie

    Posted on

    IMG_2672 (1)

    Vegan Chocolate Brownie

    Chocolate brownie is a staple. Whether that's a once-a-week staple or a rare favourite sweet treat staple, everyone needs some chocolate brownie in their life.

    This is a perfect recipe for people who are egg-free, dairy-free, nut-free, soy-free or vegan! If you feed this to an omni friend of family member, I bet they won’t even guess that it’s vegan.

    If you’re a fan of nutty brownies, simply swap out some of your chocolate chips for nuts and it’ll be perfect for you! Alternatively you can throw in some dried fruits, fresh raspberries or even mix it up with some vegan white or milk chocolate chips too.

    Once you’ve made these, store them in an airtight container once cooled and cut and they’ll stay nice and soft for about 3 days. They’ll be good to eat for longer, but they might go a bit firmer and drier, so it makes a nice excuse to eat a whole batch of brownies in just a few days.

    Let me know how you got on in the comments below, and as always make sure you tag us in all your foodie makes on instagram!


    Recipe

    Yield: 10-12

    Total Time: 30 minutes

    Ingredients:

    • 4 tbsp chia seeds

    • 1/2 / cup / 120ml water
    • 1/2 cup / 115g vegan margaine, melted
    • 1 cup / 200g caster sugar
    • 1 cup / 220g soft brown sugar
    • 1 tbsp vanilla extract
    • 1 cup / 125g plain flour
    • 1 cup / 85g cocoa powder
    • 1/2 tsp salt
    • 1 tsp baking powder
    • 1 cup / 200g vegan chocolate chips or chocolate pieces

    Method:

    1. Preheat your oven to 175c and line a 9 x 9 inch baking pan with parchment.

    2. Mix your chia seeds with your water in a bowl and set aside to thicken. Then melt your magrarine and whisk your melted margarine and sugars together. Add your chia seeds and vanilla and whisk until combined.

    3. In the same bowl, sift in your flour, baking powder and cocoa powder, then add in your salt. Fold these in until just combined, being careful not to overmix.

    4. Fold in half your chocolate chips and then pour the batter into your prepared tin. Sprinkle the remainig chocolate chips over the top and then bake for 35-40 minutes. Even if the brownies dont look done, they will firm up as they cool so don't be tempred to over bake!
    5. Allow to cool in the pan for 20 minutes before transfering to a cooling rack and allowing to cool for a further 30 minutes before slicing and serving.


    What did you think of this recipe? Did you do anything differently? We’d love to hear from you in the comments below. Don’t forget that you can share all your foodie makes with us using the hashtag #HBivore.

    Follow us on Facebook and like us on Instagram to keep up to date with our latest recipes, news and content. You can also use the form below to receive all our news straight to your inbox each week. 

    Written by Amy Northwood
    Her-Bivore
    My passion for food and conservation has led me to where I am now! My aim is to show people that veganism can be diverse, tasty and adapted to fit every lifestyle and budget!
    You can find me on Instagram

    Amy Northwood - Her-Bivore

  2. Vegan Jam Tarts Recipe

    Posted on

    Jam Tart

    Jam Tarts

    Jump to Recipe>>

    Jam tarts are such a popular food, I can’t recall ever meeting someone who doesn’t like them, so of course it makes perfect sense to veganise them.

    Finding vegan jam tarts in the supermarkets is one way to get your quick fix, and it might excite you to know that if you're ever in a rush, ASDA own brand jam tarts are labelled vegan!

    Of course, you aren't here to find out where to buy your jam tarts from, no. I know your type, you're here for something all together a bit more special. You're here to find out how to make your very own delicate, crumbly pastry cases filled with whatever jam your heart desires.

    Aside from the obvious reason that homemade tastes 100x better than anything shop bought, these jam tarts also have so few ingredients compared to the shop bought versions which contain about 10 ingredients you can't even pronounce.

    These are one of my go-to for parties and events because they're always so popular, although I always have to check with my mum beforehand because they're so easy to do that she's normally already taken the idea before I can. She always likes to make sure she provides something vegan for me and Jack (Him-Bivore) at family events we attend, and these are popular with vegans and omnis alike. They’re so quick and easy, and will last for 4-5 days in an airtight container (although they never last that long in my house).

    Whilst the theory of jam tarts might seem simple, it's just a delicious pastry case filled with jam, right? 

    Wrong. The hardest choice of jam tarts is choosing your jam. If you're one of these people who has 5 different fancy preserves on the go at once that you picked up at a local market, homemade by your great aunt Betty or even made with the fruits fresh from your garden, your choice will be easy. Simply use them all! You can fill as many or as little of each flavour as you like, but my motto is 'the more variety the better'. 

    If you're like me, who is currently sharing a house with four other students, you probably don't have room for the selection of fine jams you wish you could have, so you and I have to just use one jar at a time (admittedly I've currently got two on the go, a strawberry and a cherry, but I'm not too sure how I got into that situation). Whatever jam you've chosen will work perfectly fine. Sweet jams though please, I can't promise how your savoury tomato jam would turn out in this. 

    The next jam on my list is pineapple, I wasn't aware it existed till I spotted it from across the room in a friends cupboard, and ever since I've been wanting to try it in this recipe.

    Size wise you can either choose to use individual tart tins like I did, or holes in a cupcake tin work too, although they don't turn our quite so pretty! One tip to always remember is DO NOT OVER FILL! The jam bubbles up, so you don't want more than just a small layer of jam otherwise you'll have a jammy mess when you remove them from the oven.

    Whichever jam and size you choose, let me know in the comments below how it worked out! As always, tag us in your instagram posts of any of our recipes you make!


    Recipe

    Servings: 12

    Total Time: 45M

    Ingredients:

    • 250g/ 2 cups Plain Flour
    • 125g/ 0.5 cups Vegan Margarine
    • Water
    • Jam of Your Choice!

    Method:

    • STEP 1: Preheat your oven to 180c. In a bowl, rub your margarine and flour together until it resembles thick breadcrumbs. Add 2 tablespoons of water and gently knead to bring the ingredients together. If its not staying together, add a little more water, but be careful not to add too much!

    • STEP 2: On a lightly floured surface, roll out your dough till its about 1/4 of a centimeter thick, then use a kinife  to cut out pastry sections big enough to fit the holes in your tart tin, with a little extra. You don't want to be pulling your pastry to fit, otherwise it'll shrink in the oven.

    • STEP 3: Gently press the circles into the tart tins one by one unntil they're all filled

    • STEP 4: Fill your pastry cases with your jam. I used 3 inch tins and they needed a heaped tablespoon of jam each, but make sure your tins only have a thin layer of jam on them.

    • STEP 5: Bake for about 18 minutes or until golden brown, the filling should be gently bubbling. Remove from the oven and allow to cool for a few minutes before transferring to a cooling rack.

    What do you think?

    We'd love to know what you filled your pastry cases with! If you wanted to get real fancy with them, you could top them with fresh fruit, making them perfect for dinner parties!

    Jack and I have had a bit of a debate over this recipe, however, about the optimum level of jam for each tart. I say 2 teaspoons, Jack seems to think 2 tablespoons, arguing that "you can never have too much jam". Does anyone else want to weigh in on this?

    If you love pastry like we do, you should check out our Apple Turnovers recipe! They're also great for taking on a picnic and if you are looking for more of a challenge, these fit the bill!

    Apple Turnovers

    On to Apple Turnovers Recipe >>

    <<Back to Recipes

    Written by Amy Northwood
    Her-Bivore
    My passion for food and conservation has led me to where I am now! My aim is to show people that veganism can be diverse, tasty and adapted to fit every lifestyle and budget!
    You can find me on Instagram

    Amy Northwood - Her-Bivore


  3. Apple Turnovers Recipe

    Posted on

    Vegan Apple Turnovers

    Vegan Apple Turnovers

    Jump to Recipe>>

    If you’re craving the yummy sweet flaky pastry of a vegan apple turnover, you’ve come to the right place. Within my recipe archive I like to try and cover a lot of the classics, those delicious snacks and desserts everyone enjoys growing up. I veganise them to show that you really don't have to give anything up to live a snack-packed, fulfilling (apple filling in this case) vegan life.

    Obviously, my collection wouldn't be complete without this absolute classic. Apple turnovers are actually so easy, and to make this recipe completely accessible for all I've written it with ready-made store bought pastry in mind. This is the half cheat method to create super easy turnovers that look and taste deliciously homemade, and of course, we won't tell if you don't!

    Enjoyed warm with soya cream, custard or ice cream, these make for the perfect dessert. Leave them to cool and place them in airtight containers and you've got delicious portable snacks for picnics, parties or on-the-go treats.

    Some people make their apple turnovers with raw apple, as the apple can cook inside whilst they are in the oven. However, I always cook my apples beforehand, otherwise I find they can shrink inside and you don’t get as much filling as you’d like, and if there's one thing that's key to the perfect turnover, you have to have filling in every bite. Using precooked apples also means that you can just focus on getting your pastry cooked to perfection, rather than having to worry about the apple inside too.

    If you did want to make your own pastry, simply follow a vegan puff pastry recipe and then roll it out at step 3.

    If I'm making them for a party or a finger buffet style event (or if I'm trying to watch what I'm eating) I sometimes make them smaller (although I usually just end up eating more anyway). Whilst this can be a bit fiddly with cutting the pastry into even squares, filling and sealing, they make the cutest mini turnovers you can imagine, but be sure to remember they won't need as long in the oven.

    If you're worried your apples are too sour, you can try your mix before you cool it, remembering though that it will be VERY HOT! If your mix isn't as sweet as you desire, simply add a bit more sugar till you reach the ideal sweetness. Of course, cooking apples are the apples i'm going to recommend for this recipe, I usually use bramley if I'm buying from the shop.

    This year I am lucky enough to have an apple tree in the garden of our student house, and whilst I'm not sure what species specifically, I believe they are eating apples. That said, I have used them in this recipe more than once, and they've turned out delicious. 

    If you're after that 'oh so American' flavour, Granny Smiths are the go-to apple for you. Whatever apple you choose, make sure to let us know in the comments below what you used and how it turned out (no pun intended). As always, tag us in your creations on Instagram and we might even feature you on our page!


    Recipe

    Servings: 6

    Total Time: 35M

    Ingredients: 

    • 4 cooking apples
    • 6 tbsp granulated sugar
    • 1/2 teaspoon cinnamon (optional)
    • Water
    • 1 sheet ready rolled vegan puff pastry (I use Jus-Rol which is accidentally vegan!)
    • 2 tbsp vegan margarine

    Method:

    • STEP 1: Preheat oven to 200c. Peel your cooking apples and chop them into about 1cm cubes.

    • STEP 2: Place your apples into a large pan along with 2 tablespoons of sugar and 6 tablespoons of water. Cook on a medium heat until your apple is nice and soft, but not mushy. Set your mix to one side to cool completely. (To speed up the cooking, you can spread it out on a large tray.)

    • STEP 3: Lay your pastry out and cut down the middle and then decide each strip into 3. Then melt your vegan margarine in a mug in the microwave, you’ll need a pastry brush!

    • STEP 4: Place a tablespoon of mix in the centre of each piece of pastry, then brush the reminding pastry on show with margarine.

    • STEP 5: Fold your pastry over and then press down along the edges with your fingers, and then with the back of a fork to seal.

    • STEP 6: Place on a papered tray and then brush each one on top with your margarine, then stab 2 or 3 little holes in the top of each.

    • STEP 7: In a small bowl mix together your remaining sugar and your cinnamon and the sprinkle over the top of your apple turnovers!

    • STEP 8: Bake for 12-15 minutes or until golden brown! You can either serve them warm with some vegan custard or ice cream, or leave them to cool and eat them over the next 3 days.

    How did your turnovers turn out?

    BlueberryMuffinsIt makes a change to make a fruity sweet treat instead of just chocolate all the time! How did you get on? Did you do anything differently? We'd love to know!

    If you're looking for something else to try, why not try our Gooey Blueberry Muffins Recipe

    We sold them at our stall at the Kind Heart Festival and they went down a storm! 

    On to Blueberry Muffins >>

    << Back to Sweet Treats

    Written by Amy Northwood
    Her-Bivore
    My passion for food and conservation has led me to where I am now! My aim is to show people that veganism can be diverse, tasty and adapted to fit every lifestyle and budget!
    You can find me on Instagram

    Amy Northwood - Her-Bivore


  4. Vegan Cookie Dough Cupcakes Recipe

    Posted on

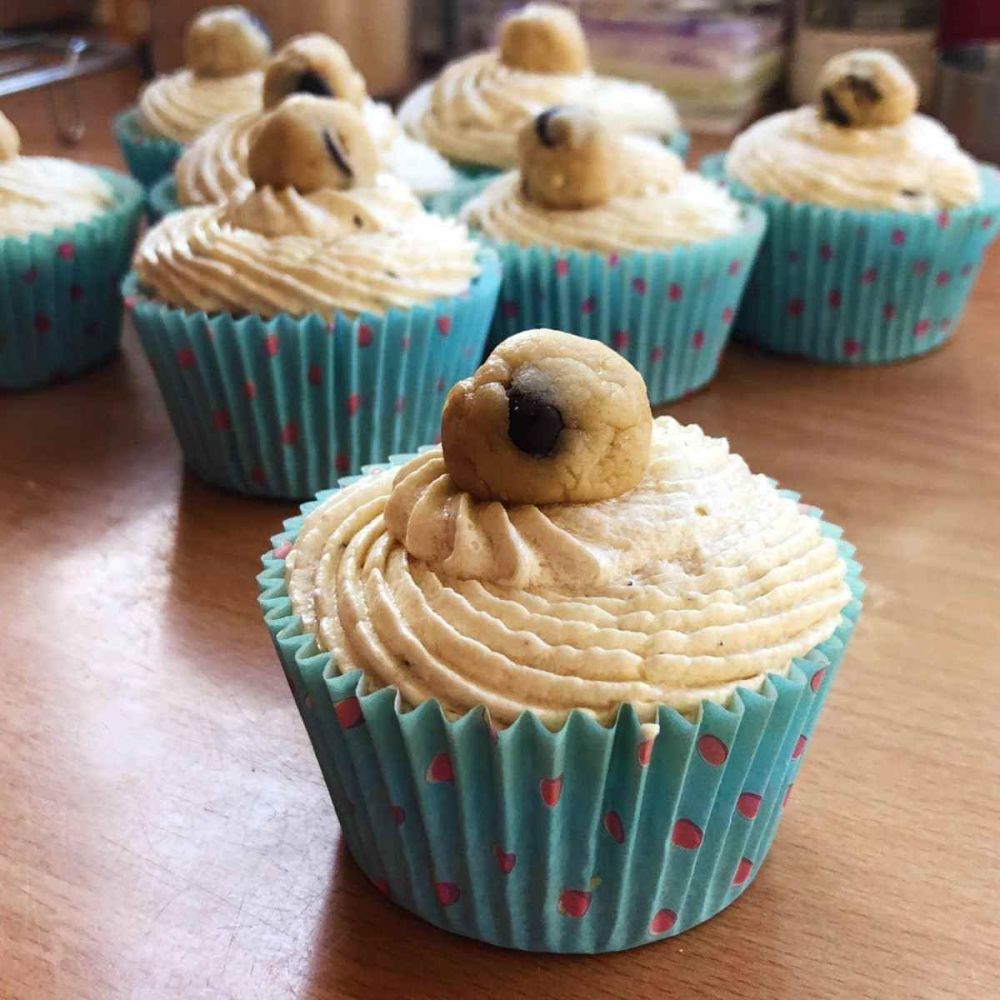
    Vegan Cookie Dough Cupcakes

    I love cake and I love cookie dough. It obviously made sense to bring the two together and make a recipe!

    This is a little bit more complicated than a normal cupcake recipe because the cupcakes have actual cookie dough in the centre, as well as cookie dough icing on top. You can skip this bit of the recipe and just have a cookie dough ball on top but that's not the right attitude. Trust me, it will be worth it!

    Although the cookie dough obviously doesn't contain any egg, it is also important to ensure the flour has been heated to a tempature at which bateria will be removed as raw flour can be a source of e-coli.

    Whether you are making these for a party, a work do, a gathering or just as a go-to snack, you are going to love these cupcakes! Let us know how you get on in the comments below. If you made any changes to the recipe, we'd love to know! (Unless of course you skimped on cookie dough, in which case... well)

    Recipe

    Servings: 24

    Total Time: 1H

    Ingredients:

    For the Cupcakes (Dry)

    • 2 1/2 cups plain flour
    • 1 1/2 cups caster sugar
    • 2 tsp baking powder
    • 1 teaspoon salt

    For the Cupcakes (Wet)

    • 1 1/3 cups almond milk (soy will also work.)
    • 2/3 cup vegetable or canola oil
    • 1/4 cup apple cider vinegar

    For the Cookie Dough Center

    • 1/2 cup vegan margarine
    • 1/4 cup light brown sugar
    • 1/2 tsp vanilla extract
    • 2 tbsp almond milk
    • a pinch of salt
    • 1 1/2 cups plain flour
    • 1/2 cup vegan chocolate chips

    For the Icing/Frosting

    • 1 cup vegan margarine
    • 1/2 cup plain flour
    • 2 cups icing sugar
    • 1/2 cup brown sugar
    • 1/2 tsp salt
    • 2 tbsp almond milk
    • 1tsp vanilla extract
    • a small handful of vegan chocolate (chopped small)

    Method:

    • STEP 1: Preheat oven to 180c. In a large bowl mix together all your dry ingredients for the cupcakes, and in a separate bowl mix together your wet ingredients for your cupcakes.

    • STEP 2: Pour the wet ingredients into the dry ones and whisk together until the mix just comes together, then divide evenly into your 24 cupcake cases.

    • STEP 3: Bake for 18-20 minutes until golden brown. To check if they are cooked, insert a cocktail stick into the centre of one of the cakes, if they are ready it will come out clean. Place on a cooling rack to cool.

    • STEP 4: In the meantime, place the flour for your cookie dough in a microwave safe bowl and microwave on full power for 45-60 seconds or until the temperature in the centre reaches 72c. Then cream together your margarine and brown sugar for your cookie dough centre.  Add your vanilla, almond milk and salt, then your flour. Finally, stir in the chocolate chips and you’re good to go!

    • STEP 5: Once your cupcakes are slightly cooled, use the large side of an icing nozzle (or something similar) and make a hole in each cupcake by pressing it into the centre. Use a teaspoon to remove the section of cake (but don’t eat them! You still need them!)

    • STEP 6: Roll your cookie dough centre into small balls and place one into the centre of each cupcake, and then press your removed cake back on to the top.

    • STEP 7: Wait until the cupcakes have completely cooled before icing them, but once they are cool cream together the margarine, brown sugar, vanilla and almond milk. Add your icing sugar and then your flour and salt. Stir in your chopped chocolate.

    • STEP 8: Pipe on to the cakes using a large nozzle so your chocolate doesn’t get stuck. At this point, you can either leave them as they are after this or sprinkle with mini vegan chocolate chips or I used my remaining cookie dough to make little balls to go on top too! if you try any other vegan toppings, let me know (I think crushed Oreo’s would also work great!).


    How did you get on?

    This was probably a fairly tricky recipe but I hope you enjoyed it!Chocolate Cupcakes

    If you liked it, then please do give it a share so other people can give it a go.

    If you are looking for a simpler recipe then you should check out my quick and easy vegan chocolate cupcake recipe. It only has two ingredients so it definitely won’t be as stressful! 

    >> To Chocolate Cupcake Recipe

    << Back to Sweet Treats

    Written by Amy Northwood
    Her-Bivore
    My passion for food and conservation has led me to where I am now! My aim is to show people that veganism can be diverse, tasty and adapted to fit every lifestyle and budget!
    You can find me on Instagram
    Amy Northwood - Her-Bivore