Her-Bivore Blog

 RSS Feed

Category: Desserts

  1. Homemade Vegan Creme Eggs

    Posted on
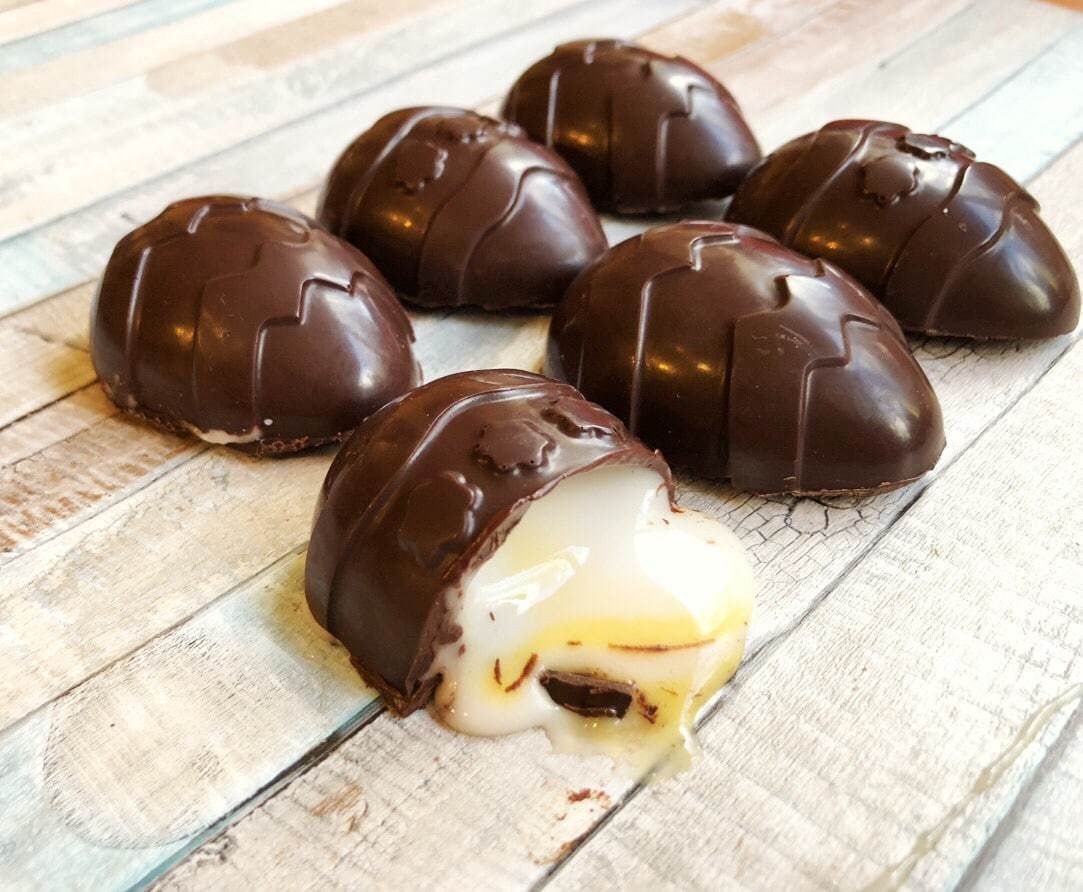
    Vegan Creme Egg

    Jump to Recipe >>

    Ah, Easter. A much loved time of year among young and old alike. A reference of new life, spring, the soon to be changing of seasons after what felt like a never ending winter. With the ideas behind Easter being all around new life, there has never been a more appropriate time to be trying out vegan, cruelty free alternatives.

    This vegan creme egg recipe is so quick and easy. This makes it a great recipe to make with children, or to make for parties or even as Easter gifts! You’ll need a chocolate mould for this recipe, I got mine from Amazon. Aside from that, these should all be ingredients you already have or are easy to pick up from any local shop. I’ve used ground turmeric to colour the inside of the egg (to create the appearance of the yolk) so there’s no nasty colours or numbers in here!


    Recipe

    Servings: 6

    Total Time: 35 minutes

    Ingredients:

    • 150g Dark Chocolate, In Small Pieces

    • 150g/2 cups Icing Sugar

    • 2 tbsp Corn Syrup or Golden Syrup
    • 1 tsp Vanilla Extract
    • Water

    • 1/2 tsp Turmeric

    Method:

    1.  Melt your chocolate on a low heat in a bowl over a pan of hot water. Make sure your bowl isn’t touching the water otherwise your chocolate may overheat. (overheating your chocolate may prevent it from setting again, or having a nice shine).

    2.  Using a teaspoon of chocolate for each egg, spread a layer of chocolate evenly over the sides and then place your mold in the fridge for 10 minutes or until your chocolate is set.

    3.  Place your icing sugar, syrup and vanilla extract into a bowl in a bowl and gently mix in a teaspoon of water. If you're consistancy looks too thick, keep adding water 1 teaspoon at a time until you reach a thick paste.

    4.  Remove 3 tbsp of your icing and place in a small bowl, then add your turmeric to the small amount of icing and mix well. This will give it a good yolk colour.

    5.  Add a tablespoon of white icing to each of the moulds, and even out.

    6. Add a teaspoon of yellow icing into the center of each mould.

    7. Add another half a teaspoon of white icing on top of the yellow, just to cover it up. Then place in the fridge for 20 minutes to firm up your icing a bit so it doesn’t run in the next step.

    8. Finally, cover the top of each egg with a layer of dark chocolate, being careful not to move the icing too much. You want to just evenly drizzle the chocolate with minimal movement once on the egg. Place back in the fridge until fully set, then just pop out of the mould carefully!


    How did it go? Let us know! Share your foodie makes with us in instagram with #HBivore. 

    Follow us on Facebook and like us on Instagram to keep up to date with our latest recipes, news and content!

    Written by Amy Northwood
    Her-Bivore
    My passion for food and conservation has led me to where I am now! My aim is to show people that veganism can be diverse, tasty and adapted to fit every lifestyle and budget!
    You can find me on Instagram

    Amy Northwood - Her-Bivore

  2. Cinnamon Rolls

    Posted on

    cinnamon rolls


    Is there anything better than the smell of freshly baked cinnamon rolls? There's something about the smell that takes me back to baking away the cold winter evenings with the warmth of the oven and my mother's kitchen advise by my side. These vegan cinnamon rolls are a variation on the bakery classic that everyone can enjoy.

    I know that they take a bit more time than some of my other recipes, but you cannot beat the fresh dough taste with the gooey sweet centre, and what they require in time, they make up for in the simplicity of the ingredients. I tried to keep my recipe as authentic as possible, no seeds, no mashed up bananas, just delicious traditional baking ingredients with a few vegan alternatives.

    These make a great breakfast treat, or even as a snack to keep you going through the day. My mix made 12 but for smaller rolls, you can cut into 15 when you reach step 6.

    Sometimes if I’m really craving that cinnamon taste, i'll increase the amount I use, but I’m a strong believer in the fact that there can never be too much cinnamon!


    Recipe

    Servings:12-15

    Total Time: 2 hours +

    Ingredients:

    Method:

    1. Melt 125g of your butter. Then in a large bowl mix your melted butter, almond milk and caster sugar. Then sprinkle your yeast on top and leave to rise for 5 minutes.

    2. Add 600g of your plain flour and your salt and mix until combined. Cover the bowl with a clean cloth and leave to rise for 1 hour. (The perfect time to make a cup of tea and fit in an episode of your favourite TV series).

    3. After 1 hour, add your remaining 75g of flour. Don’t mix it in, but use it to help you take the dough out of the bowl without it sticking too much.

    4. Place your mix onto a work surface sprinkled with flour, then knead for 30 seconds or until the mix firms up slightly, add more flour as needed to reduce sticking.

    5. Roll your dough out using a rolling pin, you want it to be a roughly 9 x 15 inch rectangle and just under an inch in thickness. Melt your remaining butter and spread it over evenly using a pastry brush, then sprinkle on your brown sugar and cinnamon.

    6. Starting from the longer side, start rolling your cinnamon rolls in one long line. Try to keep your roll fairly tight. Cut into 12 slices and place onto a papered baking tray, roll-side facing up. Cling film and allow to prove for a final 30 minutes.

    7. Bake at 180c for 25-30 minutes, or until golden brown. Leave to cool for 10 minutes and then transfer to a wire cooling rack.

    8. Once completely cooled, drizzle with water icing and they’re all set to go!


    How did it go? Let us know! Share your foodie makes with us in instagram with #HBivore.

    Follow us on Facebook and like us on Instagram to keep up to date with our latest recipes, news and content!

    Written by Amy Northwood
    Her-Bivore
    My passion for food and conservation has led me to where I am now! My aim is to show people that veganism can be diverse, tasty and adapted to fit every lifestyle and budget!
    You can find me on Instagram

    Amy Northwood - Her-Bivore

  3. Chocolate Yule Log

    Posted on

    Chocolate Yule Log

    I'm a huge fan of traditional Christmas food, and what kind of festivity would it be without a chocolate yule log? 

    While a lot of christmas foods seem to revolve around dried fruits and alcohol, this is truly the sweet treat for everyone this year.

    The rich crisp chocolate on the outside and the delicious soft sponge on the inside makes for a mouthwatering experience. This is a great recipe to make to take with you to a family gathering, and you don't even need to tell them its vegan. 

    Ingredients:

    For The Sponge

    • 230ml / 1 cup Aquafaba (the lliquid drained from a tin of chickpeas)
    • 1/2 teaspoon Lemon Juice
    • 115g / 1.25 cups Icing Sugar
    • 2 tsp Vanilla Extract
    • 2 Tbsp Coconut or Soy Yoghurt
    • 1 1/2 teaspoons Bicarbonate of Soda
    • 115g / 1/2 cup Self Raising Flour
    • 3 Tbsp Cocoa Powder
    • 1 Tbsp Caster Sugar

    Chocolate Buttercream

    • 150g / 2/3 cup Vegan Margarine
    • 200g / 2 cups Icing Sugar
    • 100g / about 1 cup Dark Chocolate, Chopped or Chips

    Method:

    1. Preheat Your oven to 180c and line a swiss roll baking tin with parchment. Add your aquafaba and lemon juice to a mixing bowl and whisk on high speed until firm whtie peaks form, this will take a while! If in doubt, leave it for slightly longer, dont worry, aquafaba doesnt overmix.
    2. Add your coconut or soy yoghurt and vanilla extract.
    3. Sift the flour, baking powder and bicarbonate of soda, icing sugar and cocoa powder into the bowl and then gently fold to combine, you want to keep as much as in as possible. Spread your mixture out onto the baking tin evenly and then bake for 10-20 minutes or until the sponge is springy to touch.
    4. Lay out another piece of baking parchment on a clean surface and sprinkle it with caster sugar. When your sponge comes out of the oven, tip it out onto the caster sugar and peel off the origional baking parchment. You then want to roll the sponge up from the short side with the baking parchment inside and leave to cool.
    5. Meanwhile, melt your chocolate in a Baine-Marie and set to once side. In a mixer, beat together your margarine and icing sugar to form buttercream, leave a around 3 tbsp of icing to one side for the inside, then add your chocolate to the rest and mix thoroughly. Once your sponge has cooled, gentle unroll it to remove the paper. Dont worry if it cracks slightly! 
    6. Spread a thin layer of buttercream onto your sponge, and then roll it back up the same way you did origionally. Use your chocolatey buttercream to cover the entire log, then use a fork of pallet knife to create textures in the buttercream to represent the bark of the log.
    7. Dust the Yule Log with cocoa powder and leave to set!

    How did it go? If you have any requests for vegan recipes you'd like to see let us know!

    Looking for a hearty recipe to get you through these cold winter nights? Why not try our Root Vegetable Stew recipe for dinner tonight...

    shutterstock_323445761

    On to Root Vegetable Stew >>

    << Back to Sweet Treats

    Written by Amy Northwood
    Her-Bivore
    My passion for food and conservation has led me to where I am now! My aim is to show people that veganism can be diverse, tasty and adapted to fit every lifestyle and budget!
    You can find me on Instagram
    Amy Northwood - Her-Bivore

  4. Chocolate Cake

    Posted on

    chocolate cake

    Chocolate cakes are perfect for every occasion, you can dress this one up as a fancy birthday cake, or just keep it simple, it's completely versitile. The sponge is garanteed to be soft a moist every time with this recipe, and it's perfect for vegans and non-vegans alike.

    Prep Time: 30 minutes

    Total Time: 50 minutes

    Ingredients:

    • 170g Self Raising Flour
    • 30g Cocoa Powder
    • 2 Teaspoons Vanilla Extract
    • 1 Heaped Teaspoon Baking Powder
    • 100g Caster Sugar
    • 1 tbsp Golden Syrup
    • 150ml Sunflower Oil
    • 150ml Almond Milk
    • 2 Teaspoons Chia Seeds
    • Warm Water

    For Decorating

    • 100g Vegan Margarine
    • 200g Icing Sugar
    • 1 tbsp Cocoa Powder
    1. Preheat oven to 160c
    2. In a small bowl, mix together your 2 teaspoons of chia seeds with two tablespoons of warm water and leave for a few minutes to form a gel.
    3. Add all your cake ingredients (including your chia seed mix) to a food processor and process for about 10 seconds until combined.
    4. Line and grease 2 x 18cm sandwich cake tins and then split your mix evenly between the two.
    5. Bake for 20-30 minutes or until a cocktail stick inserted into the middle comes out clean.
    6. Leave to cool for 10 mintues nd then turn out onto a cool rack.
    7. In a mixer, add your vegan margarine, cocoa powder and icing sugar and slowly mix together until combined. Turn your mixer to full to beat thoroughly. If your icing is a little runny, you can always add more icing sugar.
    8. Once your cakes are completely cooled, you can use a piping bag or a spatular to ice the middle, then layer the second cake on top, and ice and decorate as you please!

    We hope you enjoyed the recipe, weather it's for a birthday, other special occasion, or just because you fancied a slice.

    Follow us on Facebook and Instagram to keep up to date with our latest recipes, news and content!

    Share all your latest vegan foodie makes with us by using #HBivore.

    Written by Amy Northwood
    Her-Bivore
    My passion for food and conservation has led me to where I am now! My aim is to show people that veganism can be diverse, tasty and adapted to fit every lifestyle and budget!
    You can find me on Instagram

    Amy Northwood - Her-Bivore

  5. Blueberry Muffins

    Posted on

     Three Blueberry Muffins in a tray

    Blueberry Muffins

    Wholesome, soft and packed full of delicious fresh blueberries, these blueberry muffins are the perfect morning or midday snack. You’ll love the flavours in these, the lemon works to bring the whole thing together into one of the best muffin recipes you’ll ever make! 

    I love making these in the summer when I want cake (I always want cake…) but also want a bit more of a fresh and fruity taste rather than just going for a typical chocolate muffin.

    I’d always chosen chocolate over blueberries when it came to muffins when i was growing up, but now I think i probably like them equally. I’m determined to make a recipe for every muffin flavour i can think of, so if you think of a flavour i haven't yet done please pop it in the comments below!

    Once you’ve made these, store them in an airtight container once cooler and they’ll stay nice and soft for about 3 days. They’ll be good to eat for longer, but they might go a bit firmer and drier, so it makes a nice excuse to eat a whole batch of muffins in just a few days.

    Let me know how you got on in the comments below, and as always make sure you tag us in all your foodie makes on instagram!


    Recipe

    Yield: 10-12

    Total Time: 30 minutes

    Ingredients:

    • 250ml / 1 cup Almond or Soy Milk

    • 1 teaspoon Apple Cider Vinegar

    • 250g / 2 Cups Plain Flour

    • 2 teaspoons Baking Powder

    • ¼ teaspoon Bicarbonate of Soda

    • Pinch of salt

    • 1 1/2 cups / 300g caster sugar

    • 125ml / ½ Cup Sunflower Oil

    • 1 teaspoon Vanilla Extract

    • Zest of half a lemon

    • 200g / 2 Cups Fresh Blueberries

    Method:

    1. Preheat the oven to 180c and line a muffin tin with cases.

    2. In a jug or bowl, mix together your soy milk and apple cider vinegar, then leave to one side to curdle.

    3. In a separate bowl, combine your flour, sugar, baking powder, bicarbonate of soda and salt.

    4. In a third bowl, mix together your sunflower oil, lemon zest and vanilla extract. Add your soy milk mixture, then stir in your dry ingredients. Finally, fold in your blueberries.

    5. Spoon the mix into muffin cases, filling till about ¾ full. You can sprinkle a bit of sugar on top at this point if you want an extra little crunch! Bake for 25 minutes, or until a cocktail stick inserted into the middle comes out clean.

    6. Once cooled, you can top with a couple of blueberries if you want the same aesthetic effect!


    What did you think of this recipe? Did you do anything differently? We’d love to hear from you in the comments below. Don’t forget that you can share all your foodie makes with us using the hashtag #HBivore.

    Follow us on Facebook and like us on Instagram to keep up to date with our latest recipes, news and content. You can also use the form below to receive all our news straight to your inbox each week. 

    Written by Amy Northwood
    Her-Bivore
    My passion for food and conservation has led me to where I am now! My aim is to show people that veganism can be diverse, tasty and adapted to fit every lifestyle and budget!
    You can find me on Instagram

    Amy Northwood - Her-Bivore