Her-Bivore Blog

 RSS Feed

Category: Desserts

  1. Cranberry Blondies

    Posted on

    White Chocolate Blondies

    Cranberry Blondies

    My first introduction to blondies was years ago when I was in secondary school, every week in our English class we would take it in turns to bring in some cake for everyone. Of course there were people who skimped out and just came in with a packet of mini rolls or something, but someone came in one week with a box of homemade blondies!

    Somehow up until this point i literally had no idea that blondies existed, and i was frantically trying to work out what a ‘blondie’ was without looking like an idiot and having to ask. I gave up and just took a bite anyway (this was pre-vegan) and it was delicious.

     I hadn't really had blondies again. I started trying to put this recipe together, but since the beginning of my trials I’ve eaten more blondies than I care to admit to.

    These are so delicious, and I added in some cranberries for an extra flavour kick and a nice bit of colour, but if that's not up your street then feel free to leave them out or substitute for more chocolate chips.

    If you want to go full blondies, then you can pick up some white chocolate chips in the ‘free from’ section of most supermarkets (I get mine from ASDA). This recipe does work great with vegan milk or dark chocolate chips too though, and i quite like the aesthetic you get from having the darker chocolate chips in the blondie mix.

    Let me know how you got on in the comments below, and as always make sure you tag us in all your foodie makes on instagram!


    Recipe

    Yield: 12 

    Total Time: 45M

    Ingredients:

    • 1 cup / 300 g vegan margarine

    • ½ cup / 120ml non dairy milk

    • 1 cup / 200g caster sugar

    • 2 tsp vanilla extract

    • 2 cup / 240g plain flour

    • ½ tsp bicarbonate of soda

    • 1/4 tsp salt

    • ½  cup / 60g vegan chocolate chips (milk, dark or white)

    • ½ cup / 60g dried cranberries

    Method:

    1. Preheat your oven to 180C / 350F and line a 9” x 9” pan with baking paper.

    2. In a large bowl, mix together your vegan margarine, non dairy milk, caster sugar and vanilla extract until smooth.

    3. Sift in your flour, bicarbonate of soda and salt and mix well.

    4. Fold in your chocolate chips and cranberries and then transfer your mix into your lined tin. Smooth out with a spatula or spoon and bake in the oven for about 25 minutes, or until the top looks set.

    5. Allow to cool for about 10 minutes before transferring to a cooling rack.


    Everyone loves brownies… but I’m definitely on #TeamBlondie. They are so gooey and delicious. White chocolate has always been my preference and when you consider how well fruit flavours compliment this recipe, it has to be a winner.

    You can find our brownie recipe here. Whose team are you on? #TeamBrownie or #TeamBlondie? Let us know in the comments below.

    Don’t forget, you can share all your foodie makes with us on the hashtag #HBivore

    Follow us on Facebook and like us on Instagram to keep up to date with our latest recipes, news and content. You can also use the form below to receive all our news straight to your inbox each week. 


    Written by Jack Ricketts
    -Him-Bivore
    Marketing has always been my career focus. I am striving to promote a plant-based lifestyle to the masses through positive campaigns and sharing the benefits of veganism. The animals, and the planet, need us more than ever to make a change. 
    You can find me on Instagram


    Stay up to date with all our latest articles
    • This site is protected by reCAPTCHA and the Google Privacy Policy and Terms of Service apply.

  2. Raspberry Vegan Cheesecake

    Posted on

    Raspberry Cheesecake Slice

    Raspberry Vegan Cheesecake

    After the success of my lotus biscoff vegan cheesecake, I simply had to have another go.

    Again, the cashew and coconut flavours really shine through in this recipe, so if you aren’t a coconut fan then this one probably isn't for you (don’t worry, I’m trying to work on a nut-free cheesecake!).

    This delicious center piece tastes really creamy and stands firm for ages. It’s a big personal preference as to whether you prefer a really sweet cheesecake or a less sweet version, so I’ve included the options for both. The icing sugar in the cheesecake mix and the amount of syrup in the raspberry sauce topping are listed as optional, so if you want a sweeter dessert, add them in!

    I used a 7.5 inch springform baking pan with a loose bottom (for those who don’t speak ‘baking’, that's a baking tin with a little contraption on the side which allows you to open it and make the tin slightly bigger so you can easily remove your cheesecake, if you can get hold of one it make things a lot easier!). You can easily use this recipe to make little individual cheesecakes if you’d prefer, and they are great for dinner parties where you want to show off!

    This cheesecake (like many vegan ones) works because it sets in the freezer. Your cheesecake doesn’t have to be kept in the freezer once it has set, but don’t rush the freezing times otherwise your layers will leak into each other!

    I find it is best to make this the day before you want to eat it, because there is just so much waiting time (but it’s worth it). Take it out of the freezer the next morning, remove it from the tin, pop it on a plate and either let it defrost at room temperature for an hour, or for a few hours in the fridge before eating.

    Afterwards, if there is any left, it will keep for around 3 days in the fridge.

    You can decorate yours however you like, sometimes I like to use some chocolate chips, white chocolate curls or grated white chocolate, but there’s something beautifully elegant about topping with fresh raspberries and a dusting of icing sugar.

    Make sure you share your foodie makes with us on instagram, and let us know in the comments below what flavour cheesecakes you want to see in the future!


    Recipe

    Yield: 8-12 portions

    Total Time: 1 Day (including setting times)

    Ingredients:

    For the base:

    • 7.5 inch loose bottom baking pan

    • 10 Lotus biscuits (or 5 digestive biscuits)

    • 10 pitted dates

    • 1 cup / 100g desiccated coconut


    For the cheesecake:

    • 2 ¾ cups / 400g whole cashew nuts

    • 1 cup / 216g coconut oil, melted

    • ¾ cup / 265g golden syrup

    • 4 tbsp lemon juice

    • ½ cup / 115ml water

    • 1tsp vanilla

    • 1 cup / 125g icing sugar *optional*


    For the topping


    • 150 of raspberries + extra to decorate

    • 4 *(or 8-10)* tbsps maple syrup

    Method:


    1. Empty your cashews into a bowl and cover with boiling water, leave for an hour to soften.

    2. To make the base, put your ‘base’ ingredients into a blender and blitz them until they come together. Line the base of a spring-form pan with baking parchment and grease the edges with dairy-free spread, then cut out lines of your baking parchment to line the sides too (the margarine will help them stick). Press your mixture firmly into the bottom of the pan with the back of a spoon to level it out evenly. Place in the freezer to firm for 2 hours.

    3. Once your cashews are soaked, put all your cheesecake ingredients apart from your icing sugar together in a blender and blitz until smooth (you might need to do this in two lots). Pour into a bowl and gently mix in your icing sugar if you’re using it. Take your base out from the freezer and slowly pour your mixture in. Smooth the surface with a spoon or spatula and place again in the freezer for another 7-8 hours.

    4. Blend 150g of raspberries with 4 (of more) tablespoons of maple syrup. Take your cheesecake out of the freezer and evenly pour your mixture over the top. Place back in the freezer for another 3-4 hours, or overnight.

    5. When you are ready, pop open your spring-form pan and carefully take out your cheesecake. Peel the baking parchment off the edges (the most satisfying step, aside from eating it).

    6. Decorate with raspberries and dust lightly with icing sugar. Be sure to wait until it has defrosted before tucking in!


    Congratulations if you’ve made it this far! This recipe definitely takes a lot of patience, but it’s an amazing feeling when you release your pan and see how those layers have formed.


    As I mentioned before, this recipe easily transfers to any kind of fruit you choose. I’m going to try a mango one next I hope but I’d love to see what you come up with! Be sure to share your foodie makes with us using the hashtag #HBivore.


    Follow us on Facebook and like us on Instagram to keep up to date with our latest recipes, news and content. You can also use the form below to receive all our news straight to your inbox each week.


    Raspberry Cheesecake

    Written by Jack Ricketts
    -Him-Bivore
    Marketing has always been my career focus. I am striving to promote a plant-based lifestyle to the masses through positive campaigns and sharing the benefits of veganism. The animals, and the planet, need us more than ever to make a change. 
    You can find me on Instagram
    Stay up to date with all our latest articles
    • This site is protected by reCAPTCHA and the Google Privacy Policy and Terms of Service apply.

  3. Bramley Apple Crumble Recipe

    Posted on

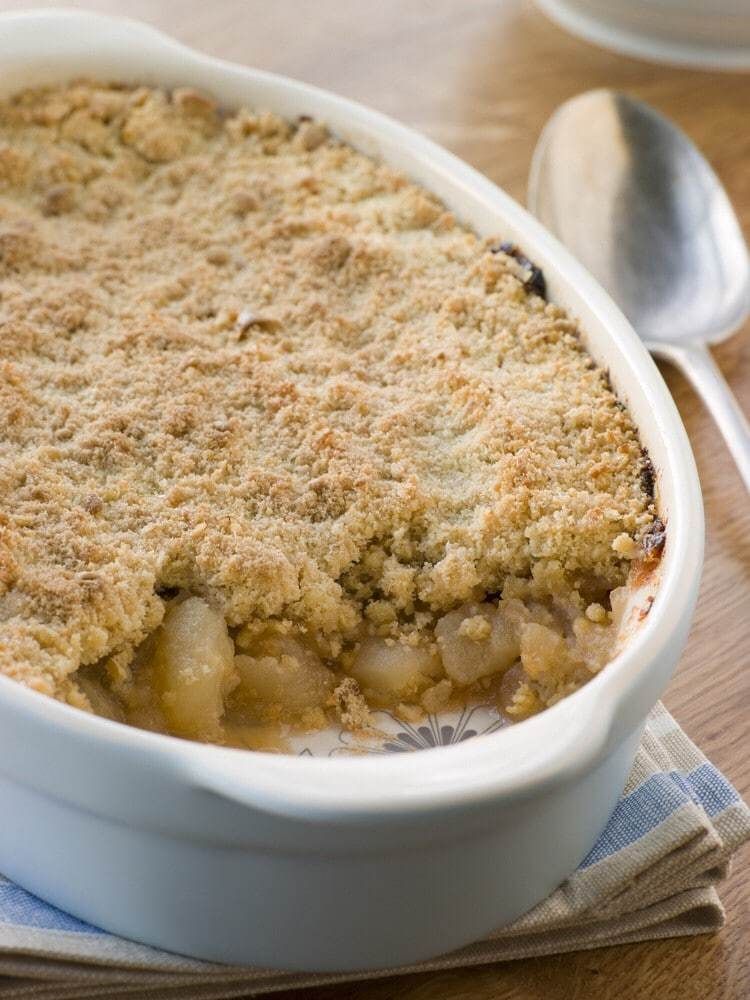
    Bramley Apple Crumble served in a crash dish next to a spoon.

    Growing up, there would always be an apple crumble on the dinner table for pudding. It’s one of those all-time classics.

    A crumble is easy enough to make, but also shows that you took the time to make a pudding, that you put love and care into it rather than heading to the shops and buying something. That and, of course, it’s a firm favourite for most!

    Making the recipe vegan wasn’t really that much of challenge. I just swapped out margarine for an alternative. However, it’s one of those recipes that you simply have got to have for any occasion which is why I wanted to share it with you.

    I serve mine with Alpro vegan custard, but you could have it plain or even use a vegan cream. Depending on your taste, you can add whatever you like into this recipe to make it yours. A tablespoon of cinnamon can work well or also adding in other fruits to your apple mix.

    You could also try sprinkling some sugar and oats on top of the crumble before you bake it for a crispier and more oaty flavour.

    I can’t say that this would work with gluten-free flour as I haven’t had the chance to try it yet. If you do give it a go, I’d love to hear about how it went!


    Recipe

    Servings: 4

    Total Time: 45M

    Ingredients:

    • 3 medium bramley apples

    • 175g + 1tbsp plain flour

    • 110g + 3tbsp golden caster sugar

    • 110g vegan margarine cut into cubes

    Method:

    1. Peel and core your apples, then slice into 1cm thick slices. Add your 1tbsp of plain flour and your 3 tbsp of caster sugar and toss well, being careful not to mush up your apple.

    2. In a mixing bowl, place your margarine and your remaining sugar and flour. Rub the mix between your hand to break up your margarine and mix with your dry ingredients, your mix should start to form the consistency of large breadcrumbs. Don’t overwork the mix otherwise you will melt the margarine.

    3. Place your apples into a 9 x 9 inch ceramic baking dish and spread out evenly, then pour your topping mix over evenly, but don’t press it down.

    4. Cook at 170c for 30-40 minutes or until your topping is golden brown. Remove from the oven and serve with your favourite vegan custard or cream.


    It’s as simple as that! It’s easy enough to prepare and it’s no trouble to bake in the background while you work on preparing dinner.

    No matter the occasion, this dessert is a great way to show you went to the effort. It’s hard to beat!

    How did you make yours? I’d love to hear about your creations. Be sure to share anything with us on the #HBivore hashtag on Instagram.

    Don’t forget, you can follow us on Facebook and like us on Instagram to keep up to date with our latest recipes, news and content. You can also use the form below to receive all our news straight to your inbox each week.

    Written by Amy Northwood
    Her-Bivore
    My passion for food and conservation has led me to where I am now! My aim is to show people that veganism can be diverse, tasty and adapted to fit every lifestyle and budget!
    You can find me on Instagram

    Amy Northwood - Her-Bivore

    Stay up to date with all our latest articles
    • This site is protected by reCAPTCHA and the Google Privacy Policy and Terms of Service apply.

  4. Lotus Biscoff Vegan Cheezecake

    Posted on

    whole cheezecake top view

    It’s taken a long time to be able to bring you this recipe, but it’s finally here, well overdue! We made a cheezecake.

    Not just any old cheezecake either; it’s a Lotus Biscoff Cheezecake, because if you’re going to bother, you may as well go all in!

    This tasted absolutely amazing and thanks to Amy’s housemates, it was gone before I could even get round to second helpings. It’s fine… I’ll get over it.

    A couple of notes before you begin, because although this looks tasty:

    1. I started making this midday on Saturday and it was ready to eat midday on Sunday

    2. My wallet was a heck of a lot lighter after picking up the ingredients.

    3. You get quite a cashew and coconut flavour, so if you don’t like these flavours, this probably isn't for you.

    It’s definitely only a special occasion kind of pudding but it’s guaranteed to be a hit. We were going to count ordering pizza as our excuse for a special occasion, but it disappeared before we had chance...

    So if you have a whole load of patience and money to burn, here’s the recipe:


    Recipe

    Yield: 8 portions

    Total Time: 1 Day

    Ingredients:

    For the base:

    • 10 Lotus biscuits

    • 10 pitted dates

    • 1 cup desiccated coconut

    For the cheezecake:

    • 14oz (400g) whole cashew nuts

    • 1 cup coconut oil

    • ¾ cup maple syrup

    • ¼ cup lemon juice

    • ½ cup water

    • 1tsp vanilla

    For the topping

    • ½ tub Lotus Biscoff spread

    • 4 Lotus biscuits to decorate

    Method:

    1. Empty your cashews into a bowl and cover with boiling water. Leave for 7-8 hours.

    2. To make the base, put your ingredients into a blender and blitz them until they start to clump together. Line the base of a spring-form pan with baking parchment and grease the edges with dairy-free spread. Press your mixture firmly into the bottom with the back of a spoon to level it out evenly. Place in the freezer to firm.

    3. Once your cashews are fully soaked, put your cheezecake ingredients together in a blender and blitz until smooth. Take your base out from the freezer and slowly pour your mixture in. Smooth the surface with a spoon or spatula and place again in the freezer for another 7-8 hours, I left mine overnight.

    4. When you are ready, pop open your spring-form pan and carefully take out your cheezecake.

    5. Gently warm your Biscoff spread in a bowl in the microwave until it reaches a gooey consistency, this will only take about 10 seconds, you don't want it getting hot. Evenly spread over the top of your cheezecake.

    6. You can then crumble more biscuits over the top however you choose. Make sure it is fully defrosted before you start to tuck in!


    There you have it. It’s funny because this recipe is actually really simple - It just takes so long to actually make when you consider all the waiting times!

    Biscoff is only one of the many options you can choose to make a cheezecake with. You could have caramel, fudge, fruit, matcha… the list goes on. If you’re feeling brave, why not try a variation! We’d love to see what you make. Don’t forget, you can share all your foodie makes with us on the hashtag #HBivore

    Follow us on Facebook and like us on Instagram to keep up to date with our latest recipes, news and content. You can also use the form below to receive all our news straight to your inbox each week. 

    Written by Jack Ricketts
    -Him-Bivore
    Marketing has always been my career focus. I am striving to promote a plant-based lifestyle to the masses through positive campaigns and sharing the benefits of veganism. The animals, and the planet, need us more than ever to make a change. 
    You can find me on Instagram

    Stay up to date with all our latest articles
    • This site is protected by reCAPTCHA and the Google Privacy Policy and Terms of Service apply.

  5. Vegan Hot Cross Buns

    Posted on

    Hot Cross Buns

    Hot Cross Buns

    Make the most of your Easter by filling the house with mouth watering smells of mixed spice, bringing together the homely scents of cinnamon, nutmeg and ginger in this (almost) traditional hot cross bun recipe. I’ve tried to keep the recipe as traditional as possible, but of course with a few vegan twists.

    These sticky glazed classics are sure to be a big hit, so despite being a bit time consuming, they’re worth the time and effort to make!


    Recipe

    Total Time: 2 Hours 30 Minutes

    Servings: 12

    Ingredients:

    • 600g strong white flour
    • 2 tbsp ground mixed spice
    • 45g vegan margarine
    • 150g golden caster sugar
    • Zest of 1 unwaxed lemon
    • 2 tsp fast acting yeast
    • 275ml almond milk
    • 125g mixed dried fruit
    • 2 tbsp apple sauce

    For the crosses:

    • 2 tbsp plain flour
    • 2 tbsp cold water
    • golden syrup

    Method:

    1. Sieve your flour into a large bowl, then add your mixed spice and margarine. Using your hands, rub together until it forms fine breadcrumbs. Add your caster sugar, lemon zest and fast acting yeast. Mix together.

    2. Add your apple sauce and almond milk, then combine until all mixed together. Add the dried mixed fruits into the bowl and work in using your hands.

    3. On a floured surface, knead your dough for about 5 minutes, adding more flour as you need to.

    4. Shape your mix into a ball, and lightly grease a clean mixing bowl with a bit of vegan margarine, then plonk your ball of dough in and cover with a clean tea towel. Leave somewhere warm to prove for 1 hour.

    5. After one hour, remove from the bowl and knock back by kneading for one minute, then place back into the bowl and re-cover with the tea towel. Leave in a warm place to prove for a further 30 minutes.

    6. After this, remove from the bowl and cut your dough in half, then each half into half, then cut each of the 4 sections into three, so you’ll have 12 in total. Shape these into balls and then flatten slightly between the palms of your hands. Place onto baking trays, leaving a small gap between each ball. Cling film loosely but ensuring the edges where the cling film meets the tray are sealed so no air can get in or out. Leave these for a final 30 minutes to prove. Preheat your oven to 230c

    7. Remove the clingfilm and mix your topping flour and water together to form a paste, then pipe the crosses onto the buns with it. Place in the middle of the oven and bake for 10-12 minutes.

    8. When you remove them from the oven, you want to use a pastry brush to spread syrup onto each bun as soon as possible.

    9. Leave to cool for 10 minutes, then transfer onto a cool rack!


    These hot cross buns are perfect to enjoy as they are, or when cooled you can cut in half, grill to toast and spread some vegan margarine on them!

    How did it go? Let us know! Share your foodie makes with us in instagram with #HBivore. 

    Follow us on Facebook and like us on Instagram to keep up to date with our latest recipes, news and content!

    Written by Amy Northwood
    Her-Bivore
    My passion for food and conservation has led me to where I am now! My aim is to show people that veganism can be diverse, tasty and adapted to fit every lifestyle and budget!
    You can find me on Instagram

    Amy Northwood - Her-Bivore